Git Guide
This guide aims to introduce you to git and is targeted at devs who currently use TFVC
Why is git popular?
- Better tooling support for non Visual Studio devs
- Better suited for open source development
- Better suited for feature branching
- The cost of supporting more than one VC system in build pipelines has resulted in products such as VSTS offering features in git before TFVC
Git is usually used from within your IDE but lets start off by running through some basic usage of git from the command line...
When using git the first thing you need to do is tell it who you are by using the git config command:

Normally your IDE does this for you
Lets make our current directory a git repository by running the git init command:

- Creates a hidden .git folder that git uses to store stuff
- Think of a repository as a TFVC workspace
Lets create a file in the workspace and put some text in it:

Now lets run git status to see the current status of our workspace:
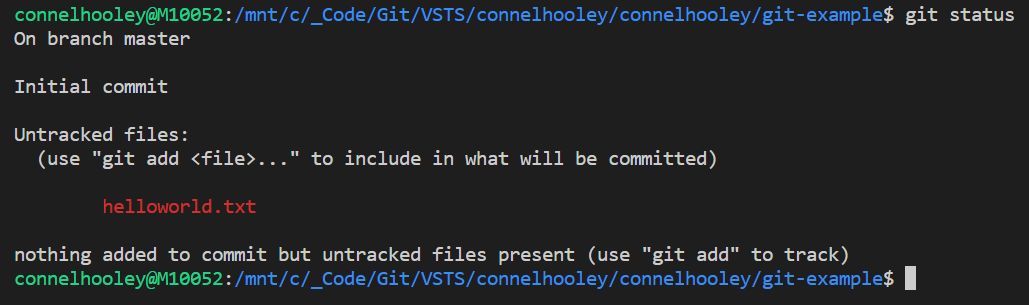
- This command tells you which files are to be included in the next commit
- A commit is the same as a check-in apart from it is entirely local
- As you can see we now have untracked files:
- We need to add them to include them in our next commit (change set)
So lets do that:

Think of this as including pending changes
Now lets run git status again:
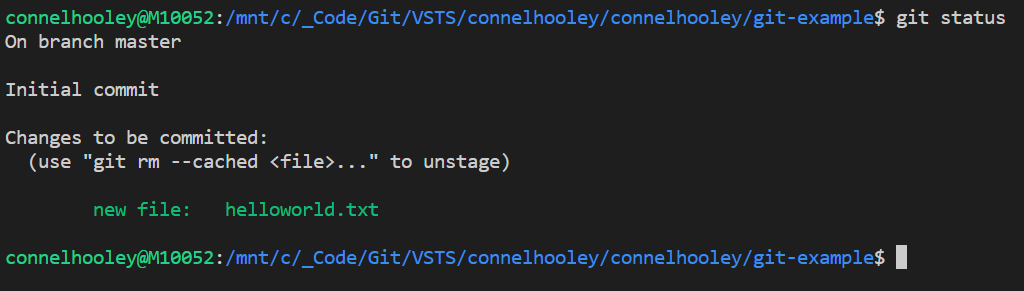
Now our changes are committed which means they will be in our next commit
Now lets run git commit to check in our changes

Git Commit
Unlike TFVC where checking in sends the changes up to a remote server, git commits are entirely local
We'll get to sending the changes to a remote server later
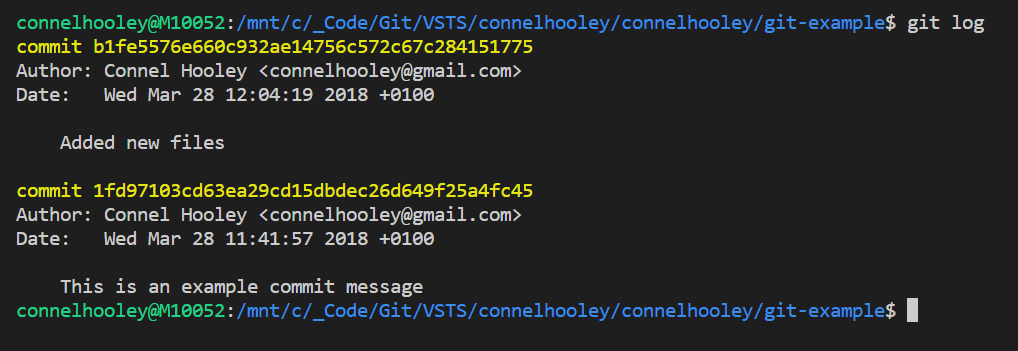
Lets run git log to view our history of commits:

- Notice the hash written in yellow next to the word commit, this is the commit ID
- Think of this as a change set ID
- A commit ID is a SHA-1 hash
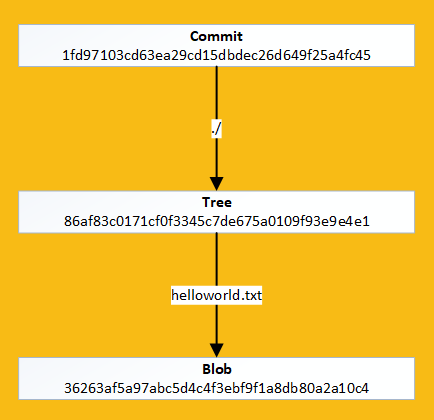
Lets decrypt the commit ID hash to see what's inside it using the git cat-file command:

- Everything here looks pretty standard apart from the tree which is another SHA-1 hash
- A tree is git speak for a directory
- This means the commit ID is a hash of a hash along side some metadata
Lets decrypt the tree SHA-1 hash:

- This tree contains a blob called helloworld.txt
- A blob is git speak for the contents of a file
Lets decrypt the blob SHA-1 hash:

As you can see it contains the file contents
Git Object Hierarchy
It's hashes all the way down
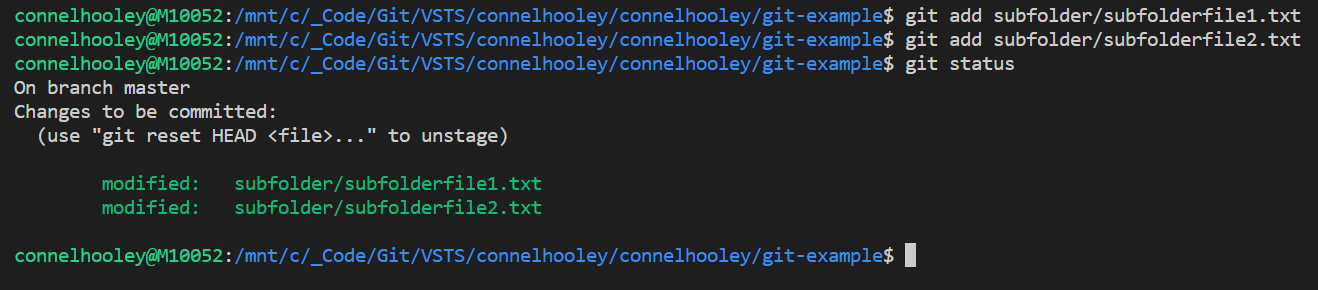
Lets add some new files to our workspace:

Lets include them in our changes (add)
and check them in (commit):

Lets view our history again
We now have 2 commits
Lets decrypt the latest commit ID to see what's inside it:

- This commit has a parent which is the previous commit
- This means that even if two workspaces contain the exact same files & folders, unless they share the exact same history and were created at the exact same time, their commit IDs will be different
- This means that if you commit some changes, then remove the changes and commit again, then the commit ID will be different despite the workspace being the same
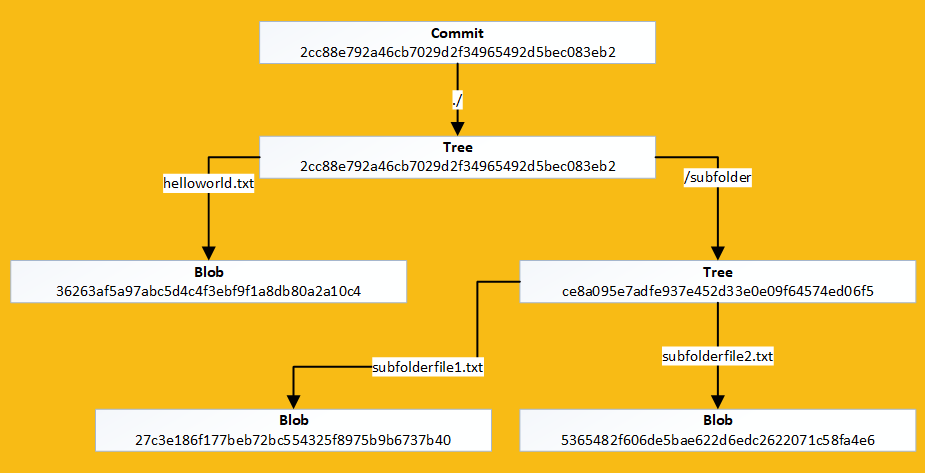
Lets decrypt the tree to see what's inside it:

As you can see, trees can contain multiple files & directories just like the file system
Lets decrypt the new directory to see what's inside it:

The tree contains the new files as expected
For completeness lets just decrypt one of the new files:

Git Object Hierarchy
Lets put the exact same content into 2 different files:

Running git status tells us we have unstaged changes:

You may notice that this run of git status talks about the files being unstaged as opposed to untracked like earlier...
Untracked vs unstaged
- An untracked file is a brand new file that has been newly created
- An unstaged file is a file that has been previously committed, but has since been modified
- This is always abstracted away from you by your IDE so don't worry about it too much
Adding the files includes them in our commit:
In git land this is usually called staging your changes
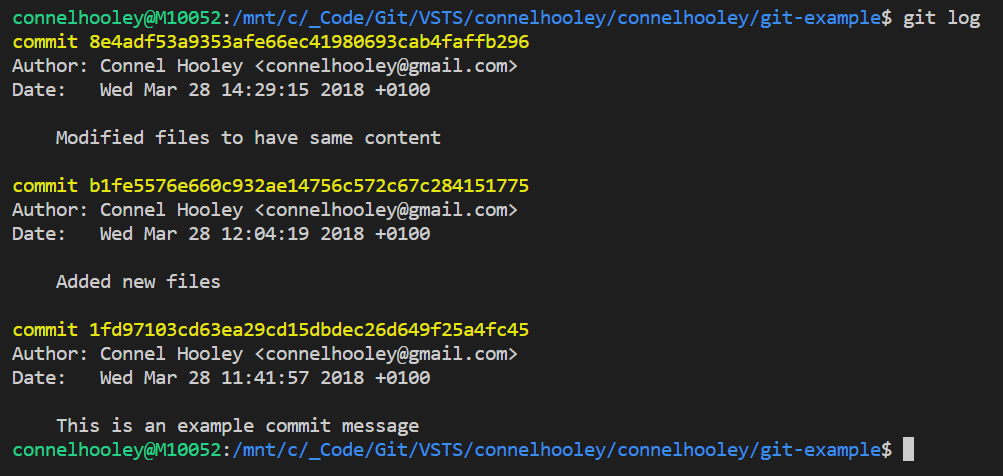
Lets commit our changes:

We can now see our history contains 3 commits:
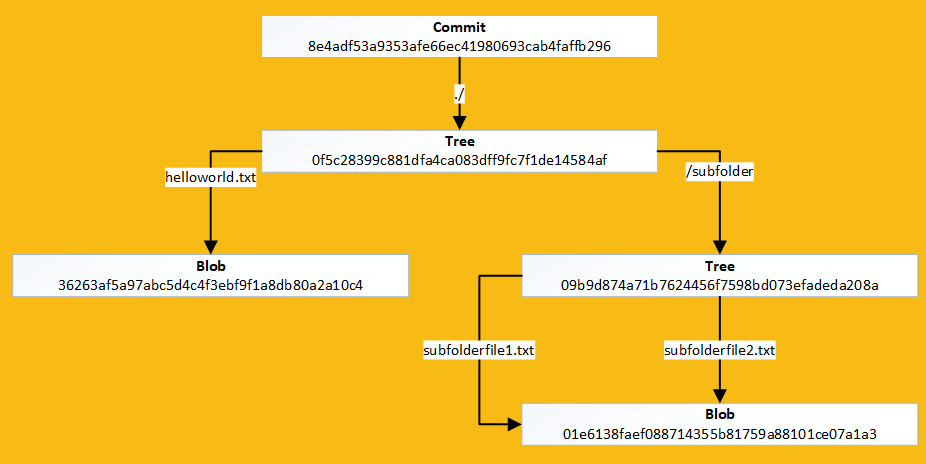
Lets view our new object tree in the terminal:

- Note how both subfolderfile1.txt and subfolderfile2.txt have the exact same hash
- This demonstrates how efficient git is when storing files locally
Git Object Tree
Lets look at actually where git stores these objects on the disk
Storage
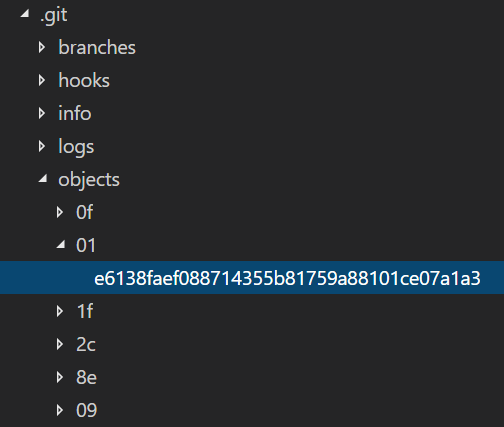
- Git stores files in the hidden directory. They are placed in:
- A directory that is named after the first 2 letters of the hash
- A file that is named after the subsequent 38 character of the hash
- The object files in the hidden directory are compressed so cannot be opened without using special git commands
You may have noticed that the blob hash for the original helloworld.txt never changed during any of the commits
This means that every commit represents a snapshot of all the files on the disk during the time of the commit, but the same file contents is never stored twice
Lets look at working with remote servers...
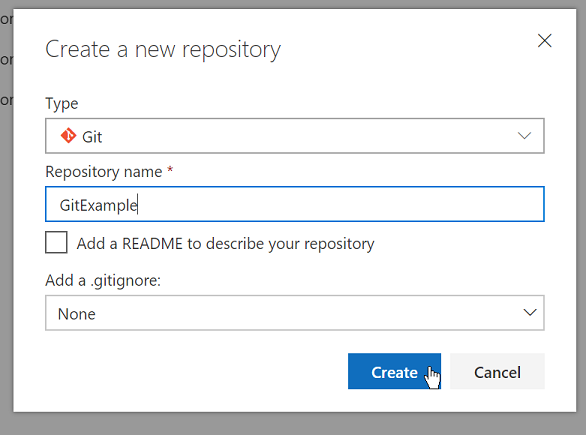
It is possible to create git repositories that are hosted by a provider
This is common practice
Creating a remote repository varies per provider, but it is usually a very simple process
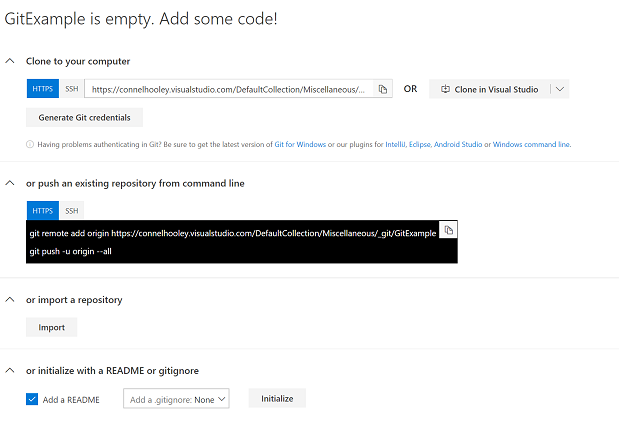
Once you have created a remote repository you then have two options. You can either:
- Take a local repository that you have already created by running git init and upload it to the empty remote repository
- Download the empty remote repository to your machine
The git hosting provider will usually give you hints on how to do both:
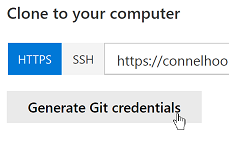
Auth
- When accessing VSTS git repositories from Visual Studio you are authenticated automatically
- When accessing the repository from the command-line like we are, we need to generate git credentials
- This is a username and password that can only be used to access the git repository
- Visual Studio uses a more advanced token based system to authenticate git users
Lets do that now by clicking on generate git credentials:
Then simply fill in the form:
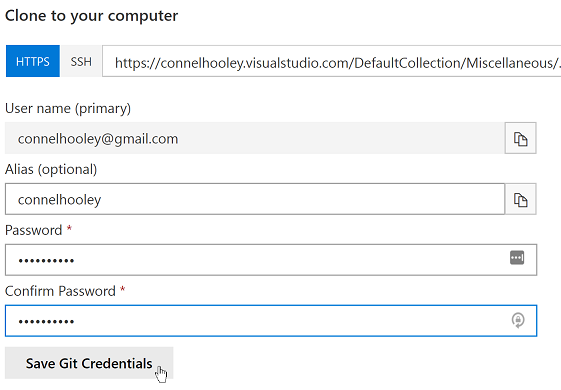
Normally you don't need to do this since you'll be using Visual Studio
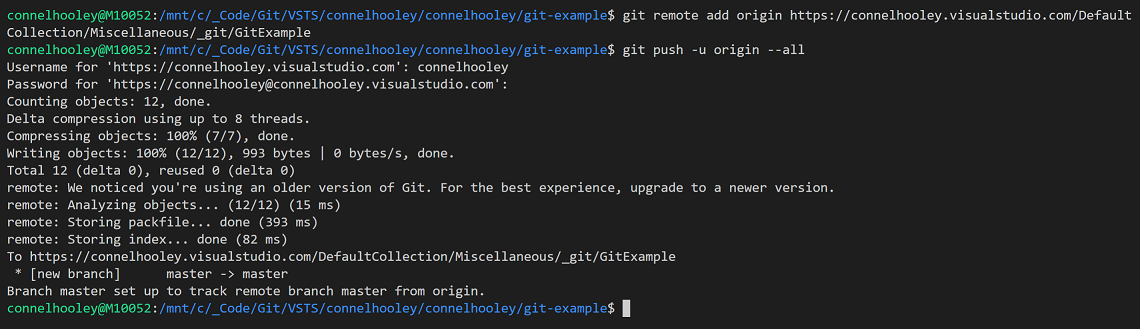
Now lets download the repository to our machine by running the git clone command with the URL that VSTS gave us:

The git clone command creates a sub directory that is a local git repository. You can create local commits in this repository and then push them up to the server.
Alternatively, if you've already got a local git repository then you can push it up to the server instead of cloning
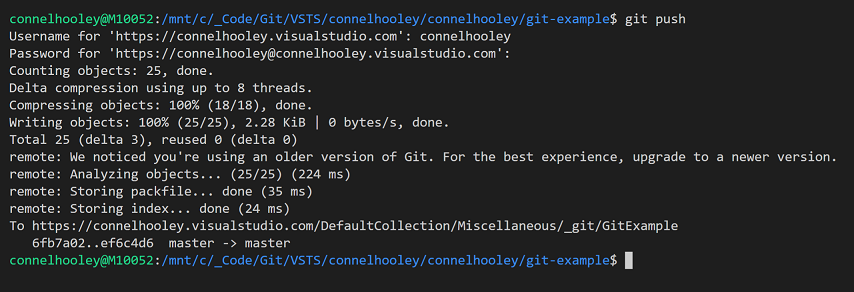
Lets push our git repository we worked on earlier to the remote VSTS repository we have created:
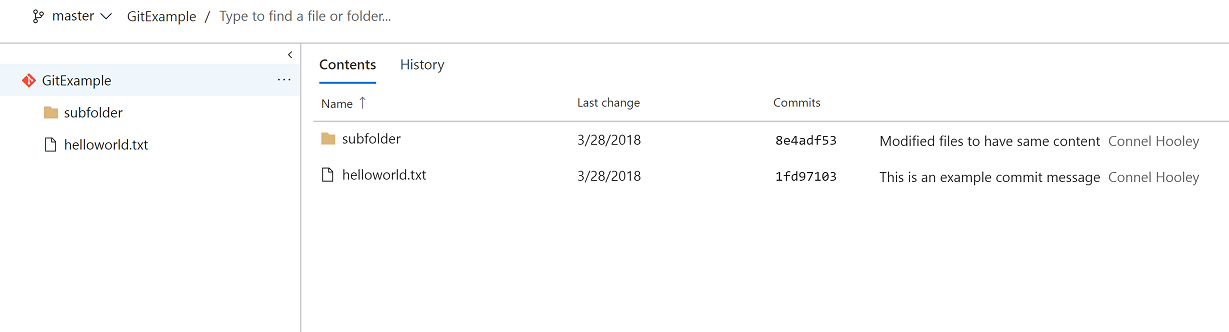
We can now see the contents of our remote repository in VSTS:
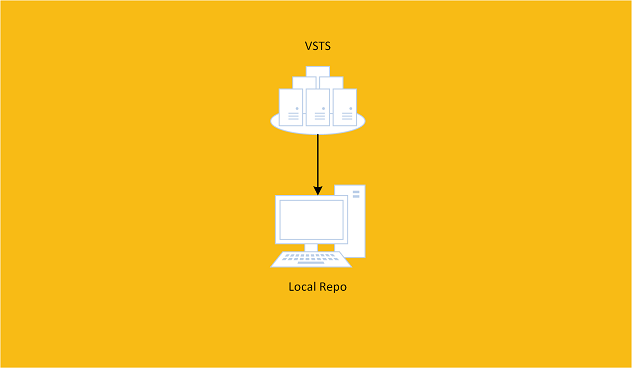
Regardless of whether we cloned a remote repository to our machine or pushed our local repository to the remote server, we now have a local repository that is "linked" to a remote repository.
We can see this "link" configured inside git's config file that you can find in the hidden .git folder:
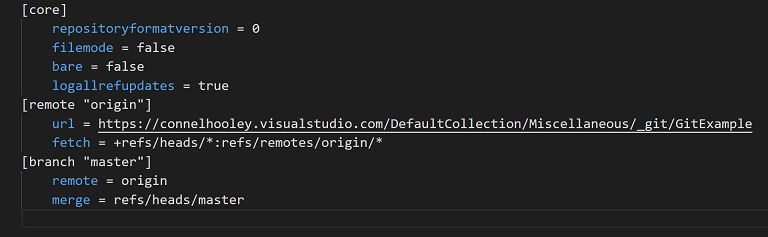
Here you can see we have one branch called master and one remote repository called origin.
You can have many remote repository linked to your local repository but this is rare.
The convention is to call your remote repository origin.
We will go through branches later.
Lets make some local changes to the repo we pushed up to VSTS by modifying a file:

- Note that it says: Your branch is one commit ahead of 'origin/master'
- This means that our local master branch has one commit that the remote master branch doesn't have
Lets make another commit modifying the same file:

We're now 2 ahead of master
We can now push our commit to the remote VSTS repository:
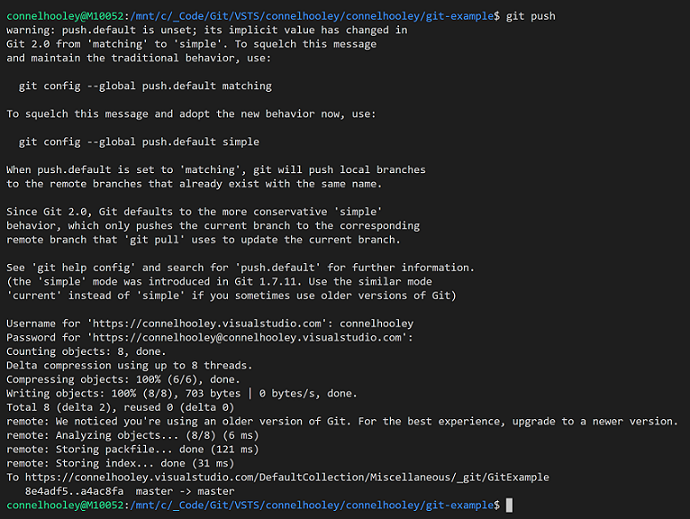
Annoyingly most of the message is about a change in behaviour that was introduced in git 2. That's embrace the new behaviour and stop that message appearing in the future:

If we look at VSTS we can see it knows about both of the new commits now:

This allows us to make our commit messages in git much more descriptive than our check-in messages in TFVC.
Since we are in control of when others can see our changes, we can make lots of small commits with descriptive messages and then push them when we are ready.
This is in contrast to TFVC messages where you only describe your changes when you're ready to publish them, resulting in a larger amount of changes needing to be described.
Commit messages are also mandatory, you must provide one - unlike check-in messages
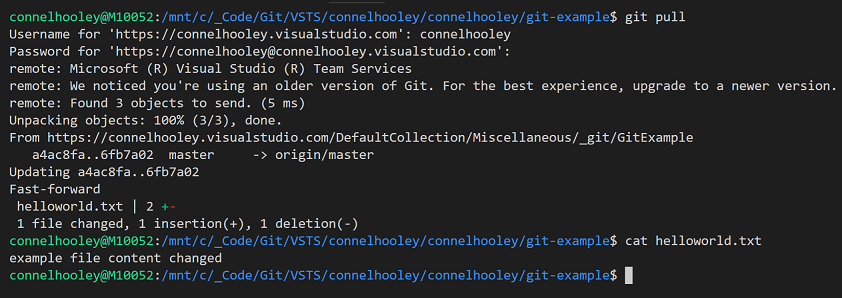
Lets make a change on the remote server that isn't on our machine:
This is the same as someone else making a commit, and then pushing it to the remote repository
Lets pull that change down to our machine using the git pull command:
Lets recap what we've seen so far...
git repository
==
TFVC workspace
git commit
==
TFVC changeset
git commit && git push
==
TFVC check-in

git pull
==
TFVC get latest
git staging changes
==
TFVC include pending changes
git commit id
==
TFVC changeset id
Lets see what all this looks like in Visual Studio...
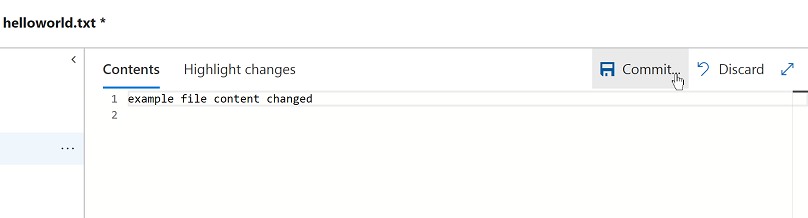
After we've made some changes in our local repository we can review our changes inside the changes window:
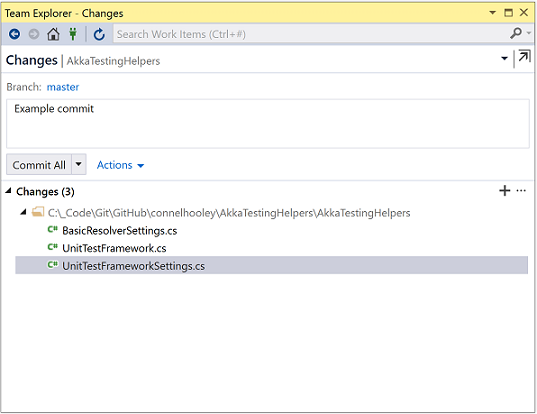
By default all changes are staged
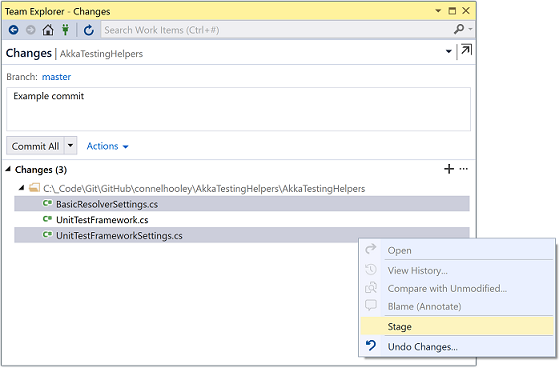
You can also choose which files to commit by using the right click menu to stage only some of them:
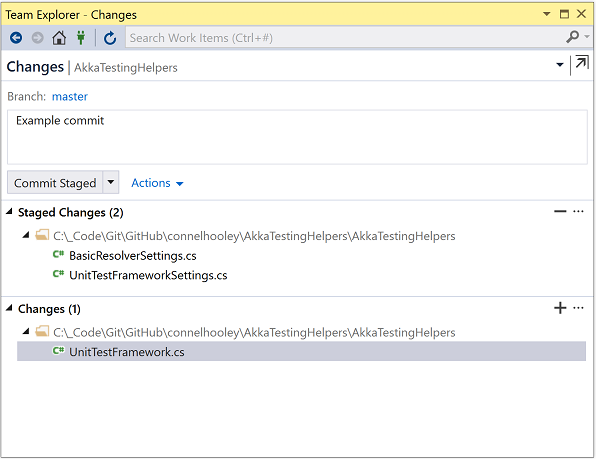
If you choose to stage only certain files, then the other files are unstaged:
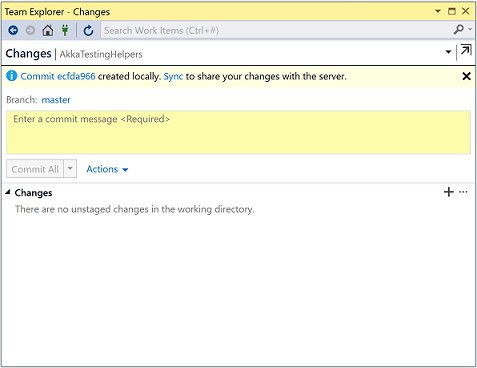
Once you have committed, you need to push your changes to the server. To do this click on sync:
Visual Studio has a feature called sync Sync just calls pull then push
Clicking on the blue sync link underneath the branch name performs a sync
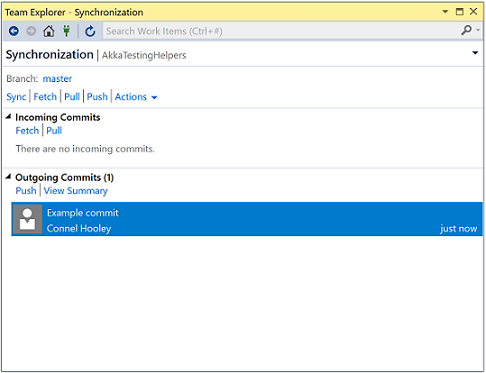
The local repository and the server will then have the same code for the current branch
You can view commits by right clicking on the solution and then clicking on history:
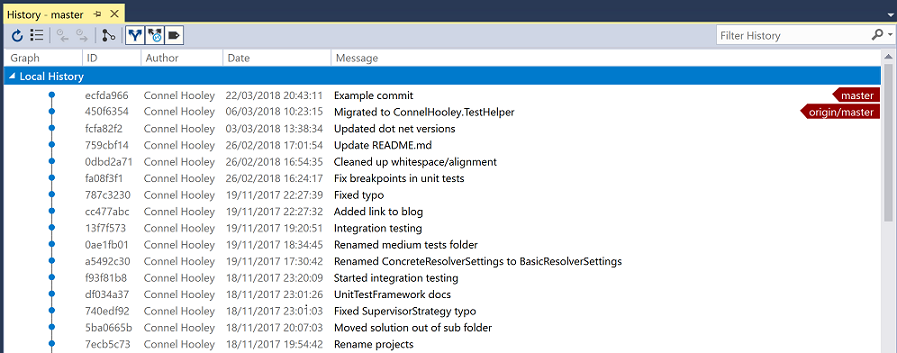
The read arrows on the right-hand side point to which commit the local and remote repositories consider to the latest:
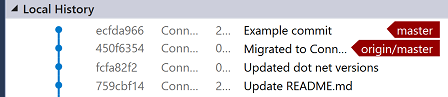
This means our local branch is 1 commit ahead of the remote repository
Lets create a new branch inside our repository:

This command creates a branch and "switches" to it
Unlike in VSTS where branches are represented in mapped folders, git repositories manage different branches by allowing you to switch between them.
When you switch branches your workspace is changed to represent the branch you're changing to.
Having lots of branches on your machine doesn't actually take up as much room as you'd think since git is efficient and only ever stores the same version of a file once. Normally branches will have more in common than differences.
When you switch branches your workspace is instantly changed to represent the branch you're changing to.
Lets make a change in our new vnext branch:

Now we can view the contents of the modified file before and after changing branches:

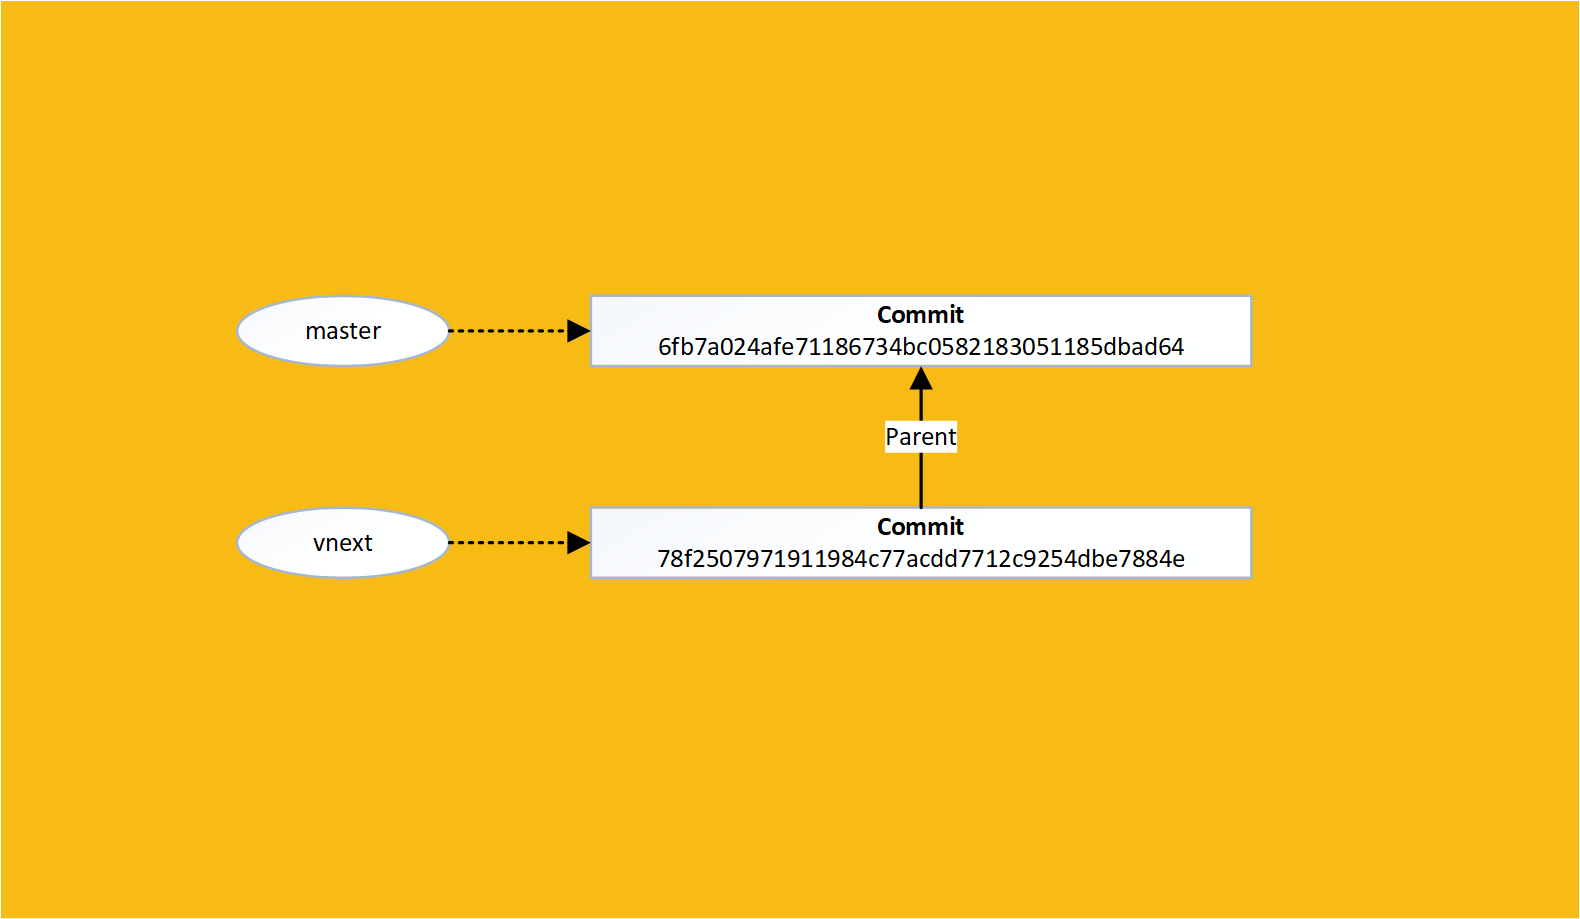
A branch in git is simply a link to a commit id
When you perform a commit the current branch is updated to the new commit
Git Object Hierarchy
Lets make a change to our master branch that conflicts with the change in vnext:

Git Object Hierarchy
We can now try and perform a merge:

Since we are currently in the master branch, this merges vnext into master
As expected we have a merge conflict, we can see this by running git status:
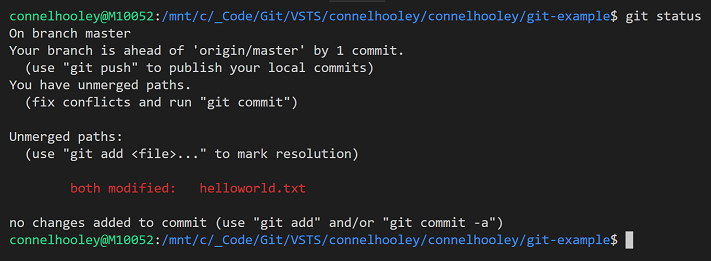
If we look inside the conflicted file, we can see that git has put both modified versions of the conflicted line in the file:

We can fix the merge by modifying the file and then performing a commit:

Note we didn't have to specify a commit name, since our workspace was in process of performing a merge
Note that if we were merging with Visual Studio then we would have the standard merge window and this would handle the extra commit command required
If we run git log then we can see the merge commit:

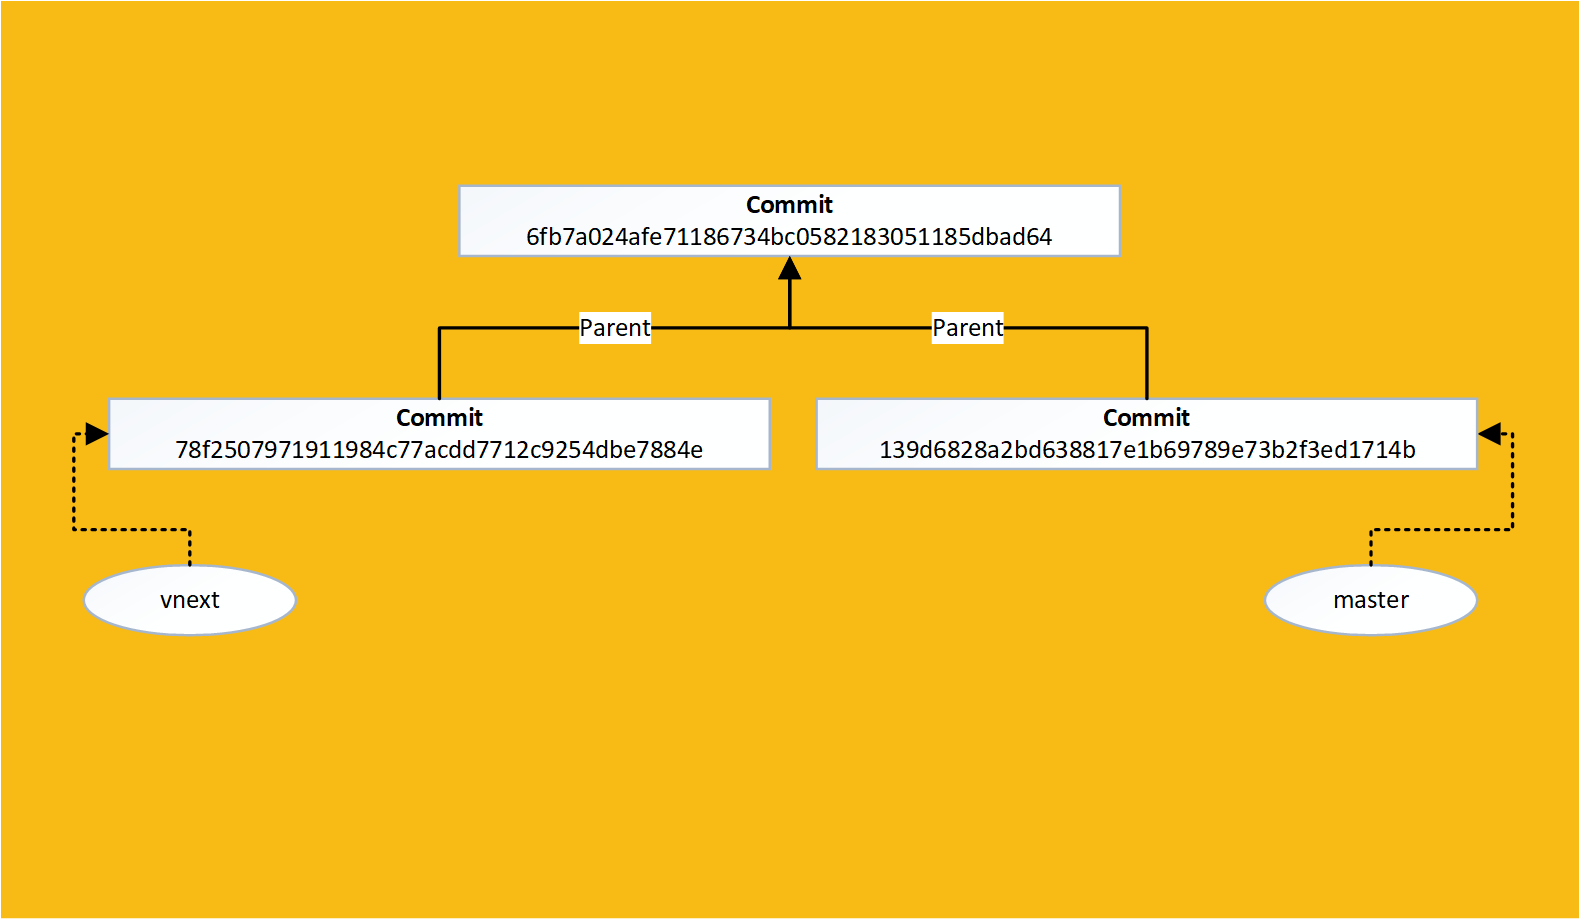
If we decrypt the commit we find something interesting about it:

Merge commits have 2 parents
Git Object Hierarchy
Git also has a merging feature called rebase
When merging a branch it can be difficult to track where certain changes come from
Rebasing allows you to stack one branch on top of another
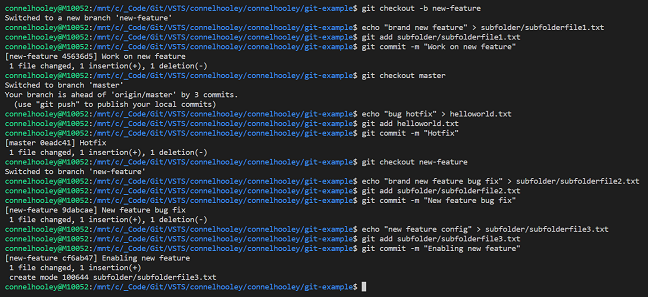
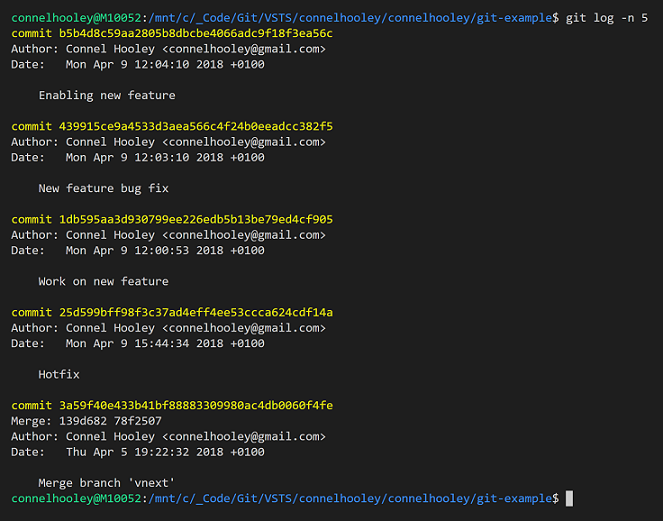
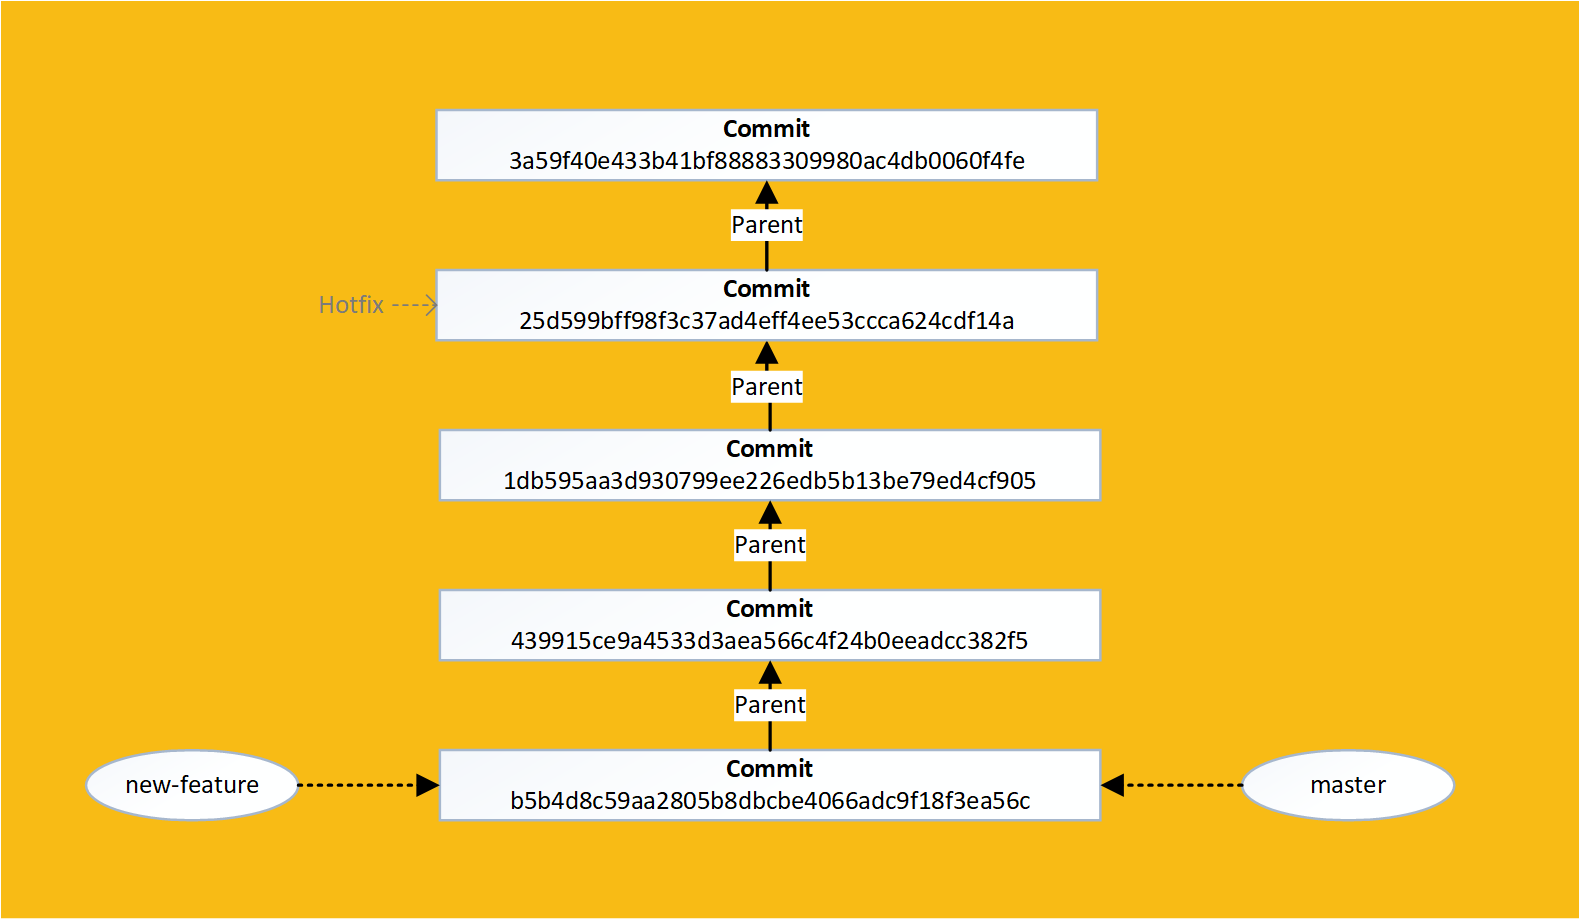
Lets make some changes in a new branch but perform a hotfix to the master branch in the process:
Git Object Hierarchy
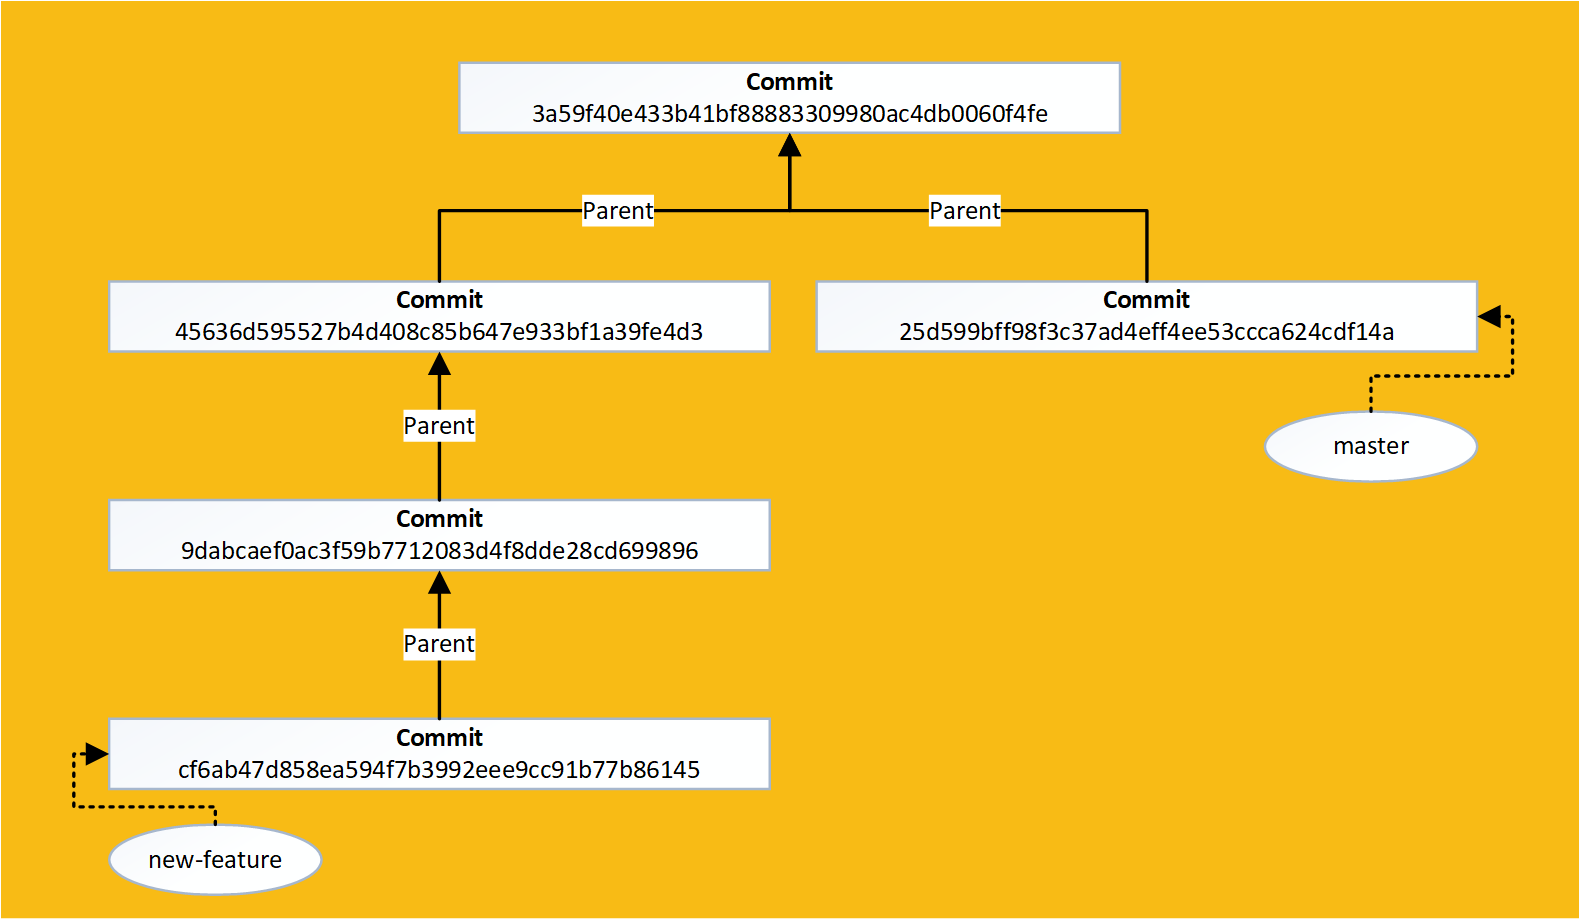
Now we can rebase our new-feature branch onto the latest version of the master branch:

If we view our last 5 commits you can see that our changes have now been made "on top of" our hotfix:
Git Object Hierarchy
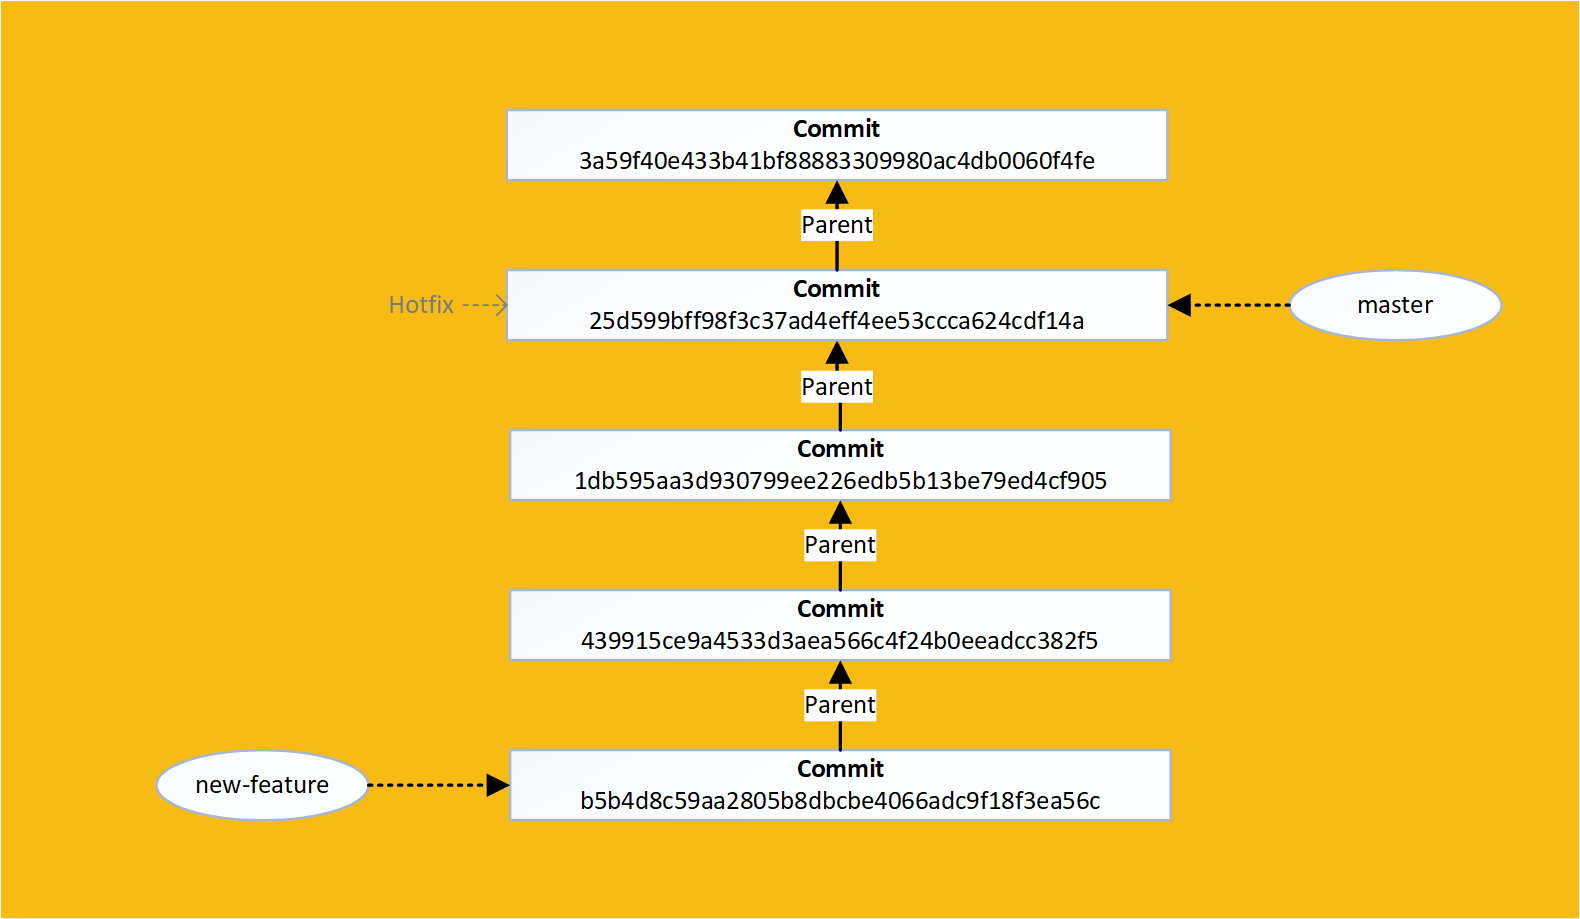
We now have a much simpler commit history, and all the new feature commits are grouped together
If we want our rebased changes to go into the master branch then the merge is very simple as we have all the changes from master in our branch already
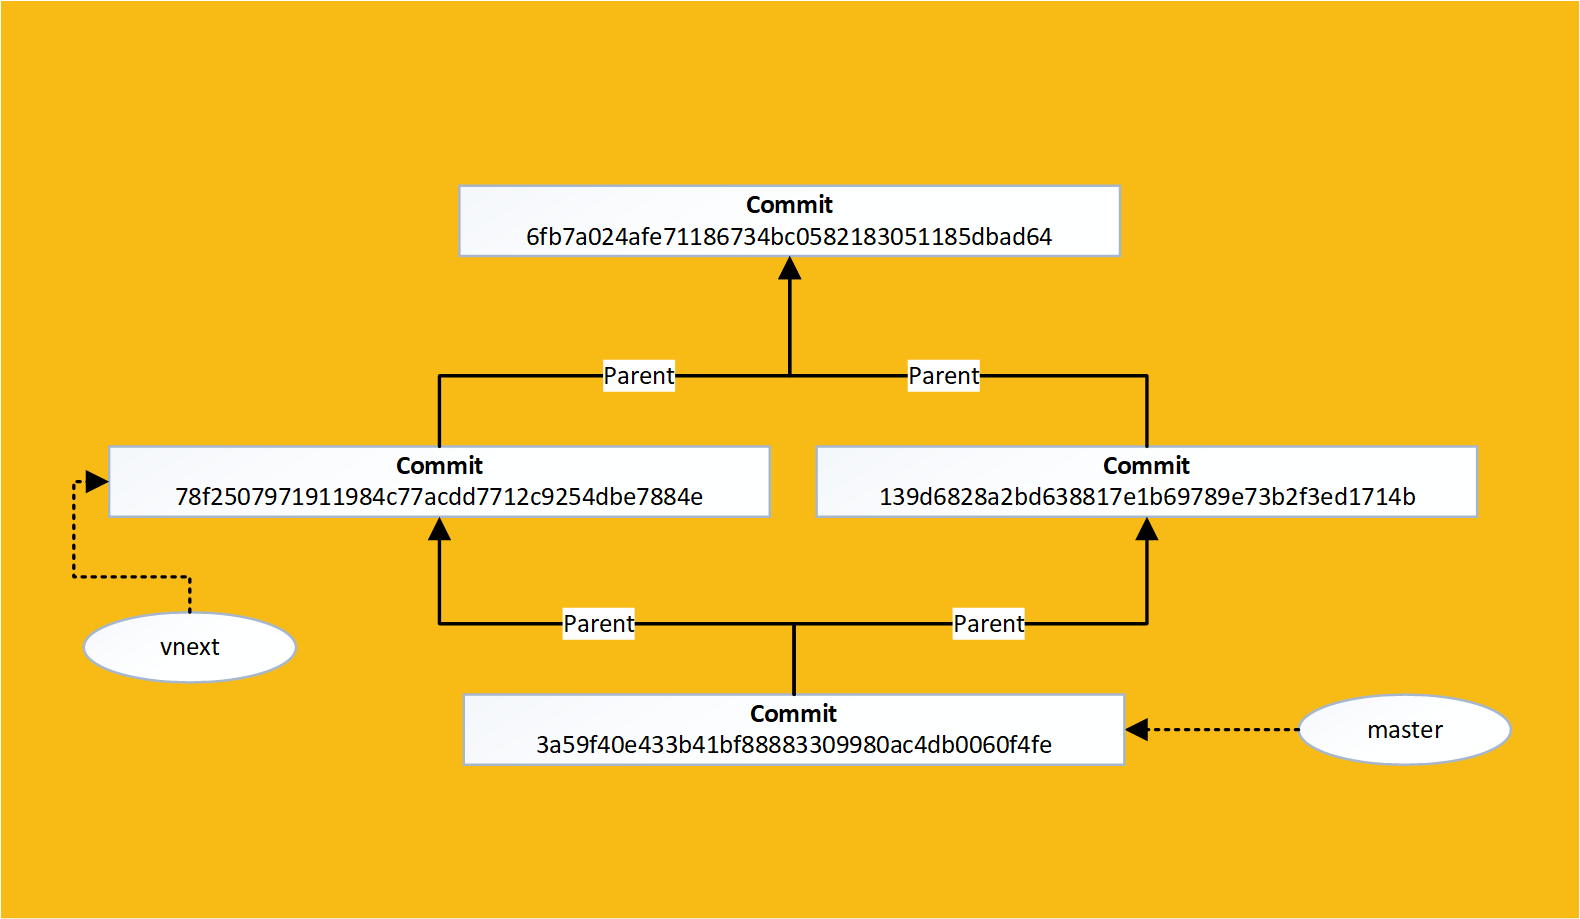
Since our new-feature branch is now an extension of master we can do a simple merge to bring master up to date:
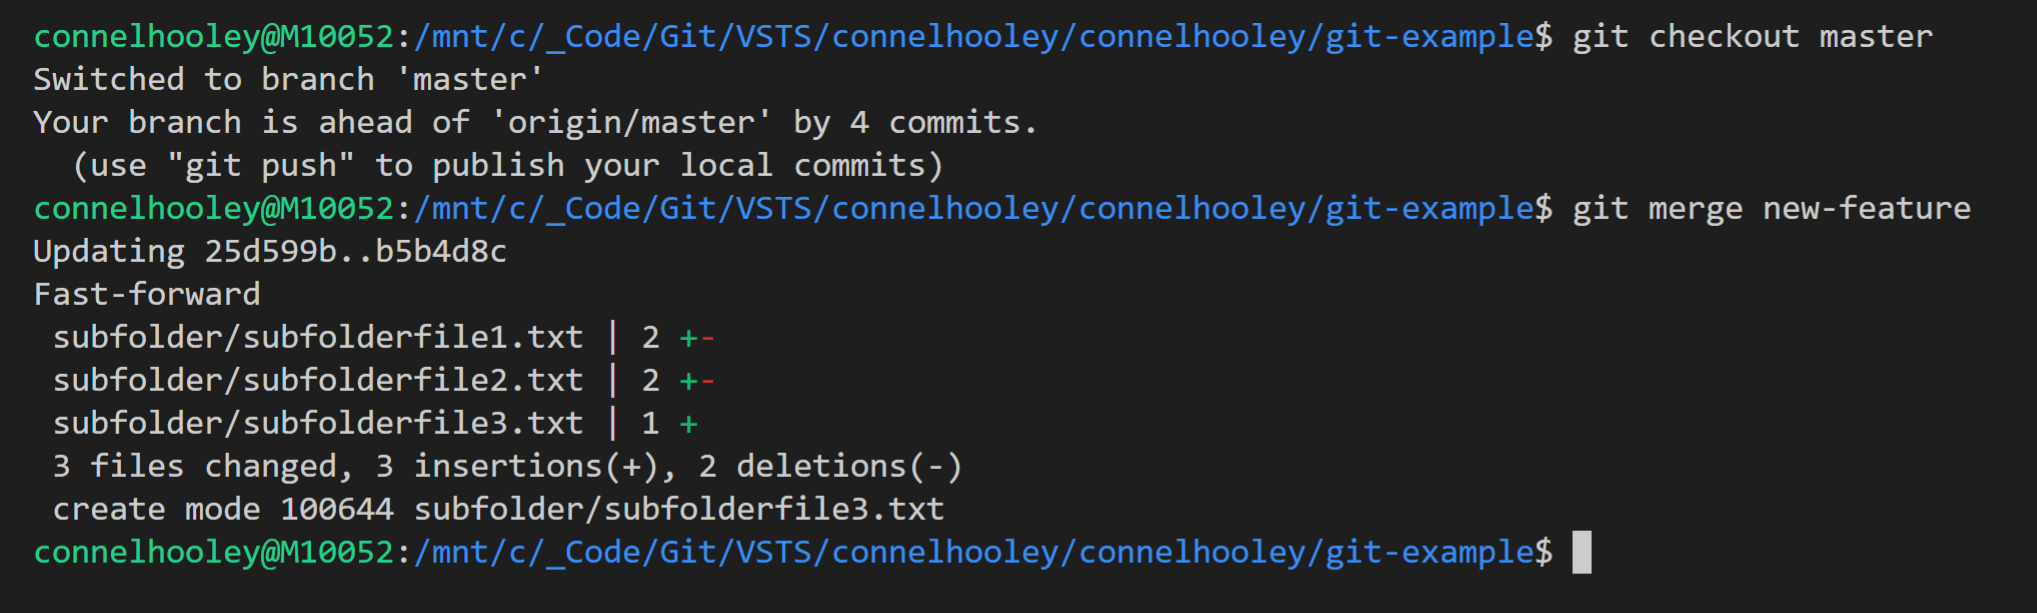
When the branch you're merging in already has all of the commits of the current branch, this is called a fast-forward merge
Git Object Hierarchy
Think of performing a rebase as saying:
"I want my changes to be applied to the latest version of the source branch"
A git tag is a snapshot of the code at a given moment in time
Branches and tags are merely links to a commit
When a commit is made, the current branch is updated to point at the latest commit, whereas a tag does not move
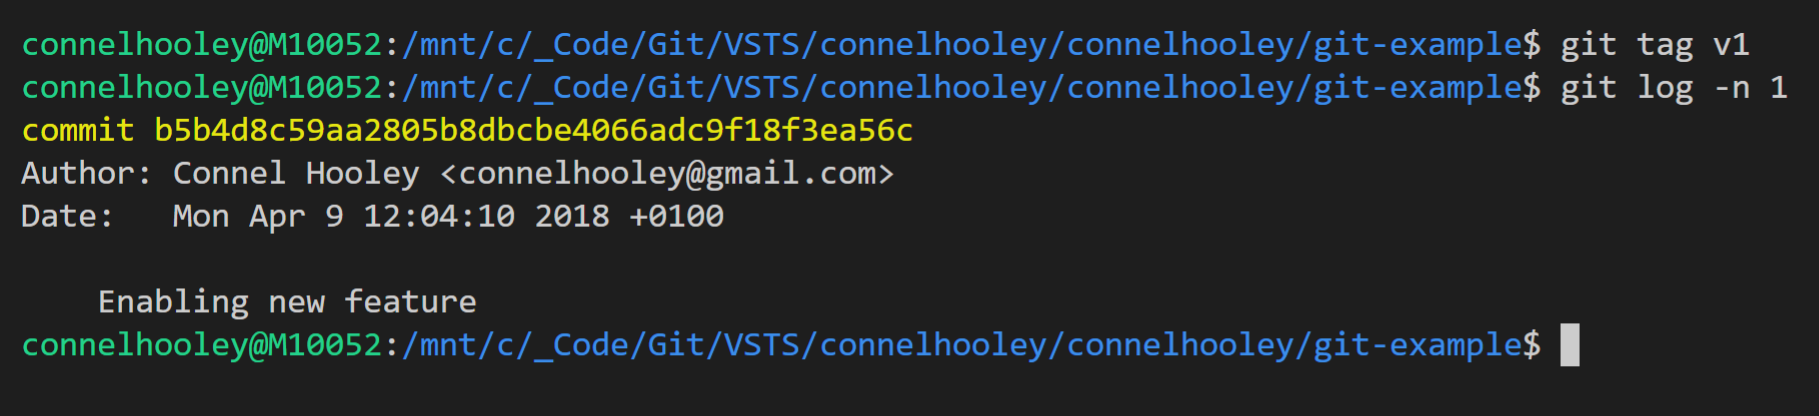
Lets create a tag using the git tag command:
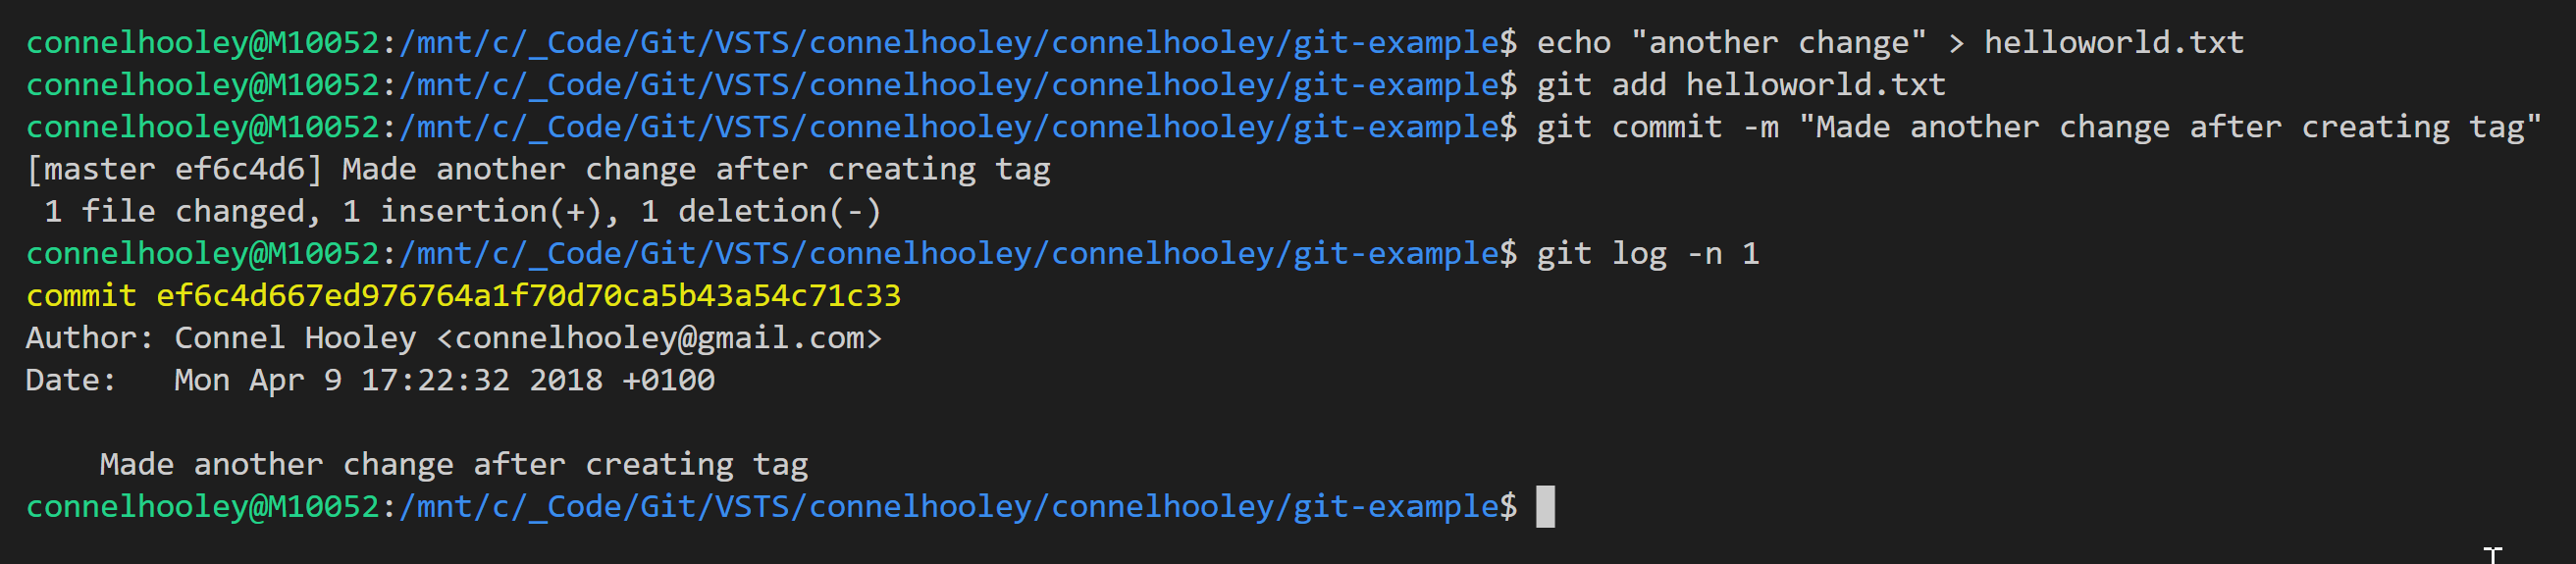
Now lets make a change to our branch:
Git Object Hierarchy
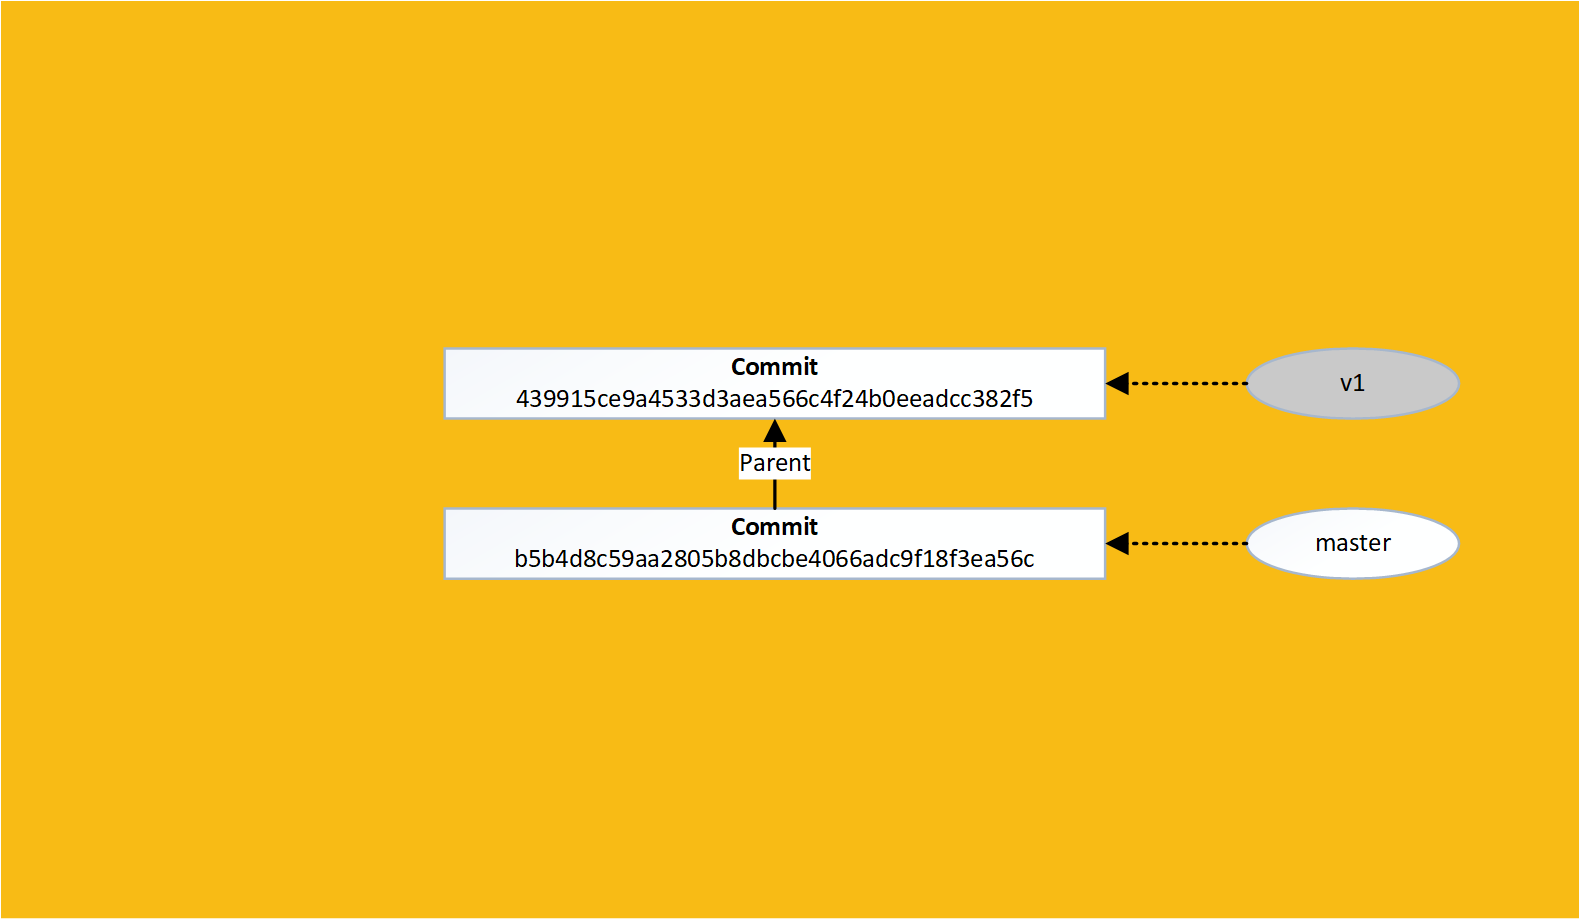
This makes tags a perfect way to track releases
The git push command only pushes commits from branches that the remote server knows about
Lets run a git push command now:
If we look at VSTS we'll see that it still doesn't know about any of our branches or tags we've created locally:
We must push these branches and tags up manually
This is to prevent all your local experimental dev branches being uploaded
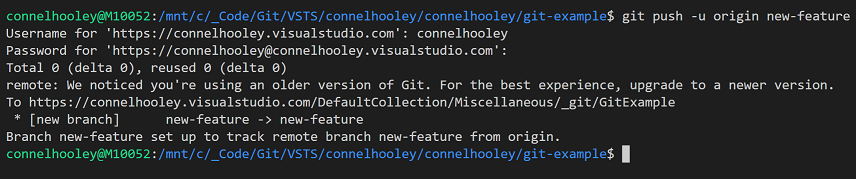
To push a local branch add a couple of parameters to the push command:
Visual Studio does this for you...
You'll now see this branch in VSTS:
This also works for tags:

Visual Studio does not do this for you...
You'll now see this tag in VSTS:

Lets see what branching and merging looks like in Visual Studio...
Lets start off by creating a branch
Go to the Team Explorer
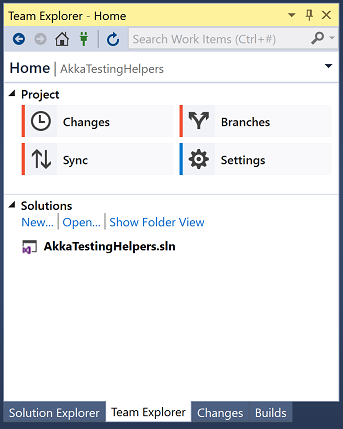
And click on "Branches"
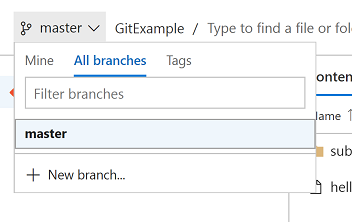
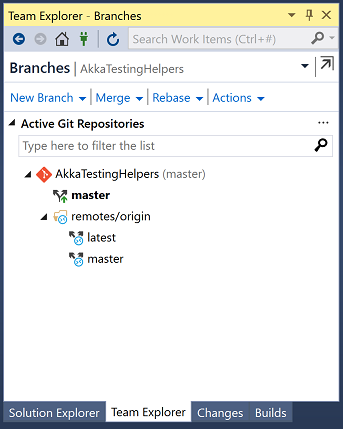
Here we can see our local and remote branches:
Click on "New Branch" to create a branch
Enter the name of your new branch and click on "Create Branch":
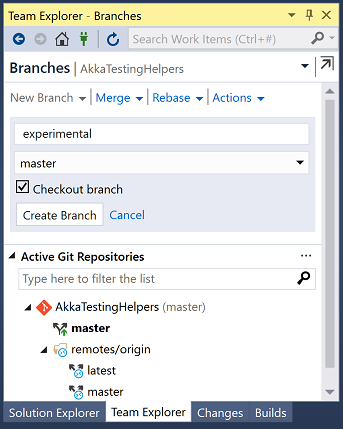
Leaving "Checkout branch" ticked means you'll switch to this branch once it is created
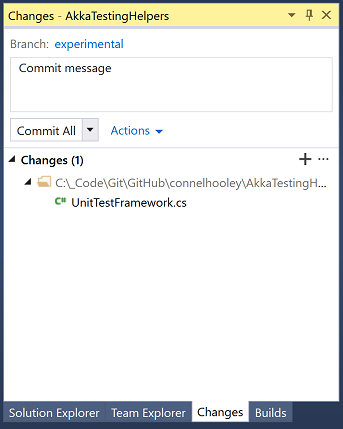
Make some changes to a file, then go back to Team Explorer:
And click on "Changes"
Enter your commit message and click on "Commit All"
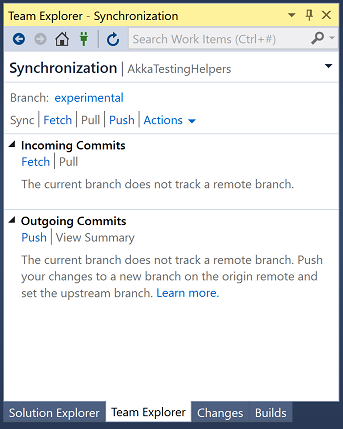
Go back to Team Explorer:
And click on "Sync"
Click on "Push" to push your new local branch to the remote server:
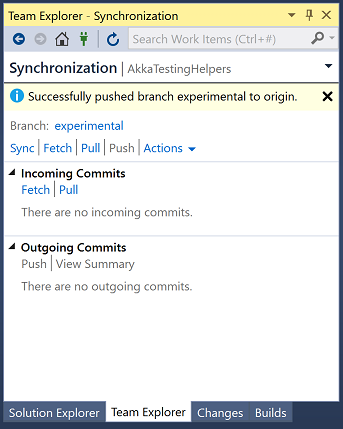
Visual Studio will tell you when it's finished:
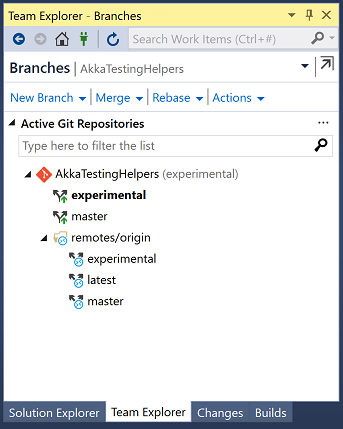
If we go back to the Branches screen we can see there is a remote version of our new branch that others can now see:
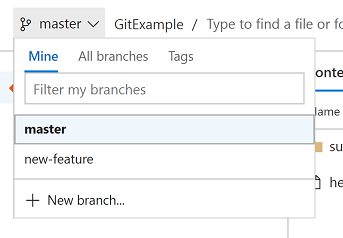
The easiest way to switch branches is to use the menu on the bottom right hand corner:
Use this menu to switch between branches and then commit conflicting changes in either branch
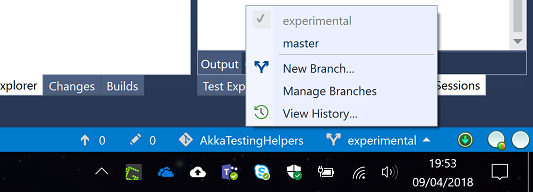
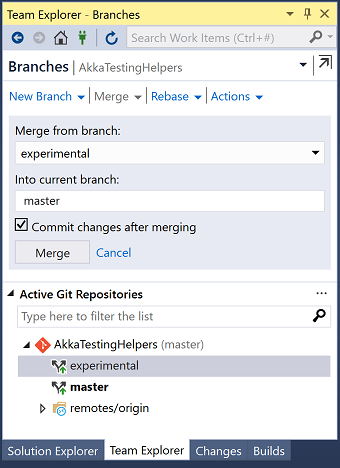
Now go to the Branches screen:
And click on "Merge"
We're switched to the master branch, so lets merge our experimental branch into our master branch:
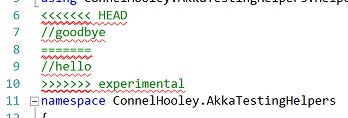
Visual Studio will tell you about the conflicts:

If we view the conflicting file we'll see the merge text git puts in the file:
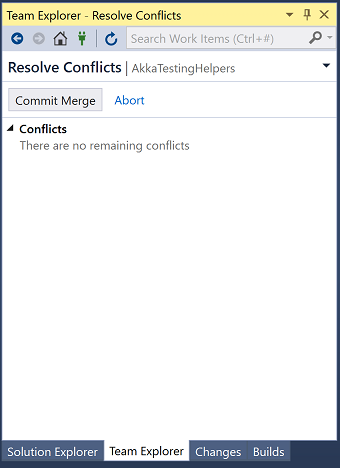
If we go back to the Changes screen we can either cancel the merge by clicking on "Abort" or resolve the conflicts by clicking on "Conflicts 1":
If we click on "Conflicts 1" then a list of files that have conflicts:

Clicking on a file gives us some options:
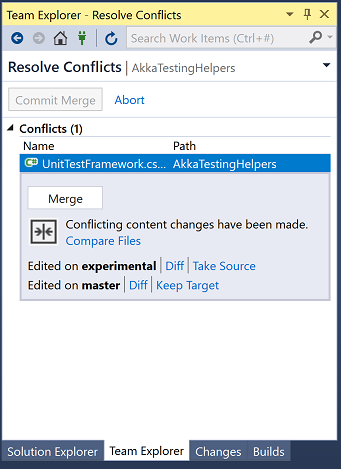
If we click on "Merge" then we see the familiar conflicts window:
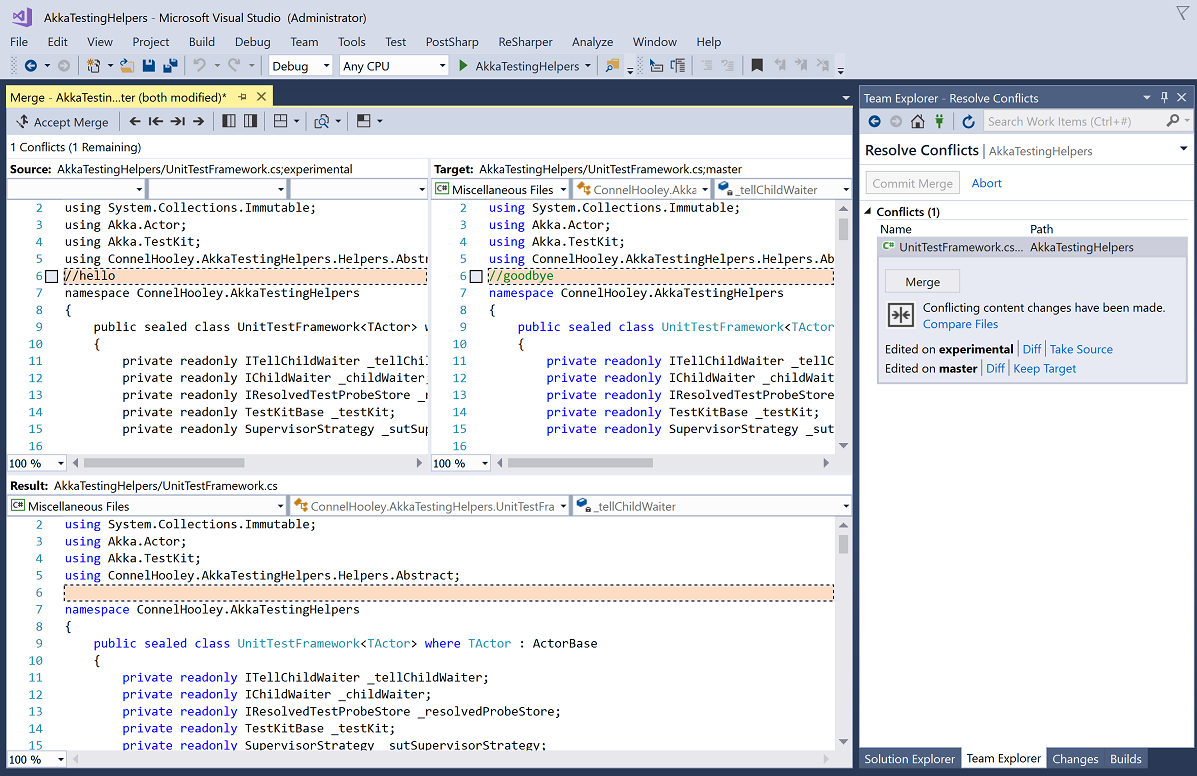
Once we have resolved the conflict we can commit our merge (or abort it):
Clicking on "Commit Merge" takes us to the commit screen:

It has a handy note saying we're in the middle of a merge
We can then push our merge commit to the remote repository just like any other commit
Git also has a feature called a pull request
A pull request is not actually a feature of git itself, but is actually a feature that git providers offer
With open source projects anyone can access your source code
This also means they can change it to add new features
Open source projects require the ability to stop anyone just modifying the remote repository at will
But they also require the ability to take changes from other people's repository
Lets run through how this works in git...
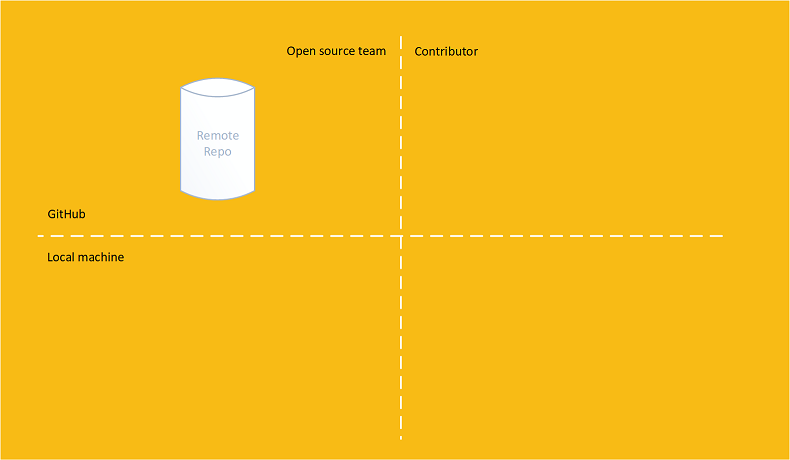
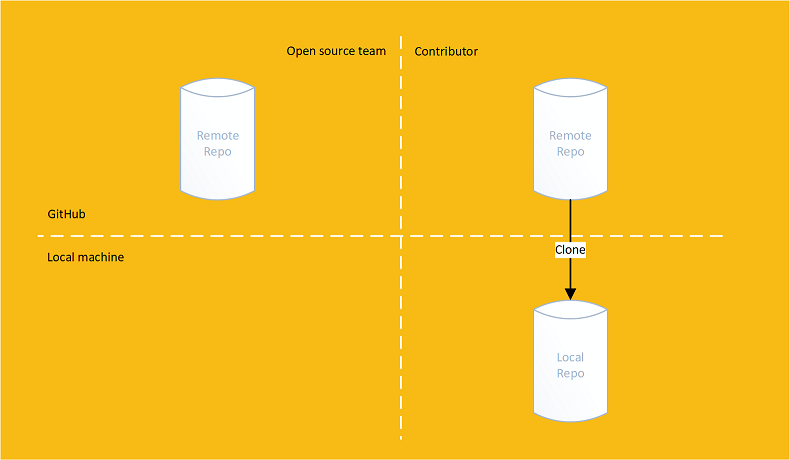
Imagine an open source team has an public repository:
A contributor forks the remote repository into their own remote repository
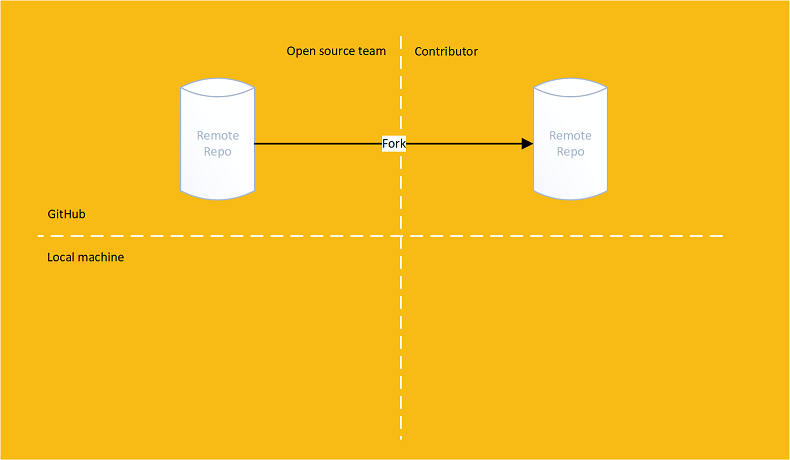
Forking is a feature offered by a git provider, not git itself
The Contributor only has read access to the original repository but has read and write access to their forked copy
Contributors clone their forked remote repository onto their machine:
They make changes in their own local repository and push them up to their forked repository

They then perform a pull request:

A pull request asks the original repository's owners if they would like to pull the changes from the forked repository
Pull requests are a feature offered by a git provider, not git itself
Most git providers offer a GUI including a comments/forum section where the original repository's owners can discuss the changes
The original repository's owners can then accept or reject the pull request:
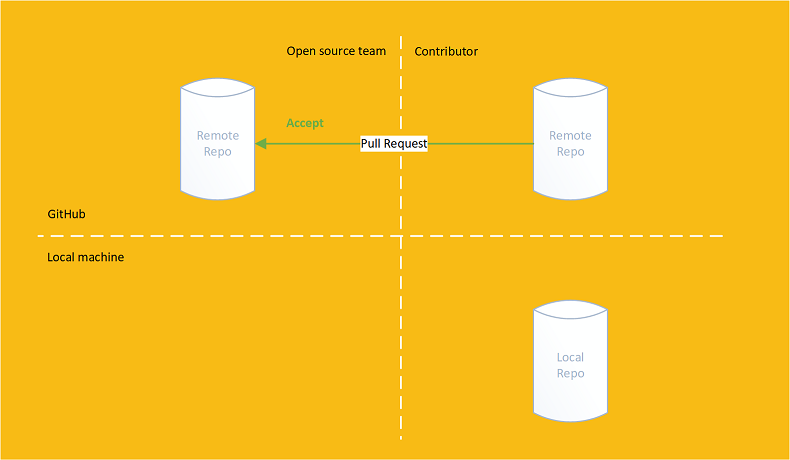
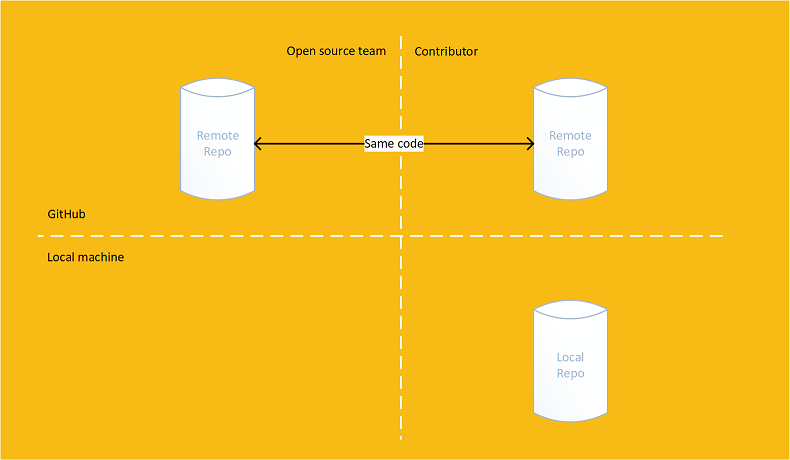
If accepted then the original and forked repositories will contain the same code:
Because the UI for commenting on the changes and the ability to accept and reject is so useful for code reviews, some git providers also allow dev teams to perform pull requests on branch merges too
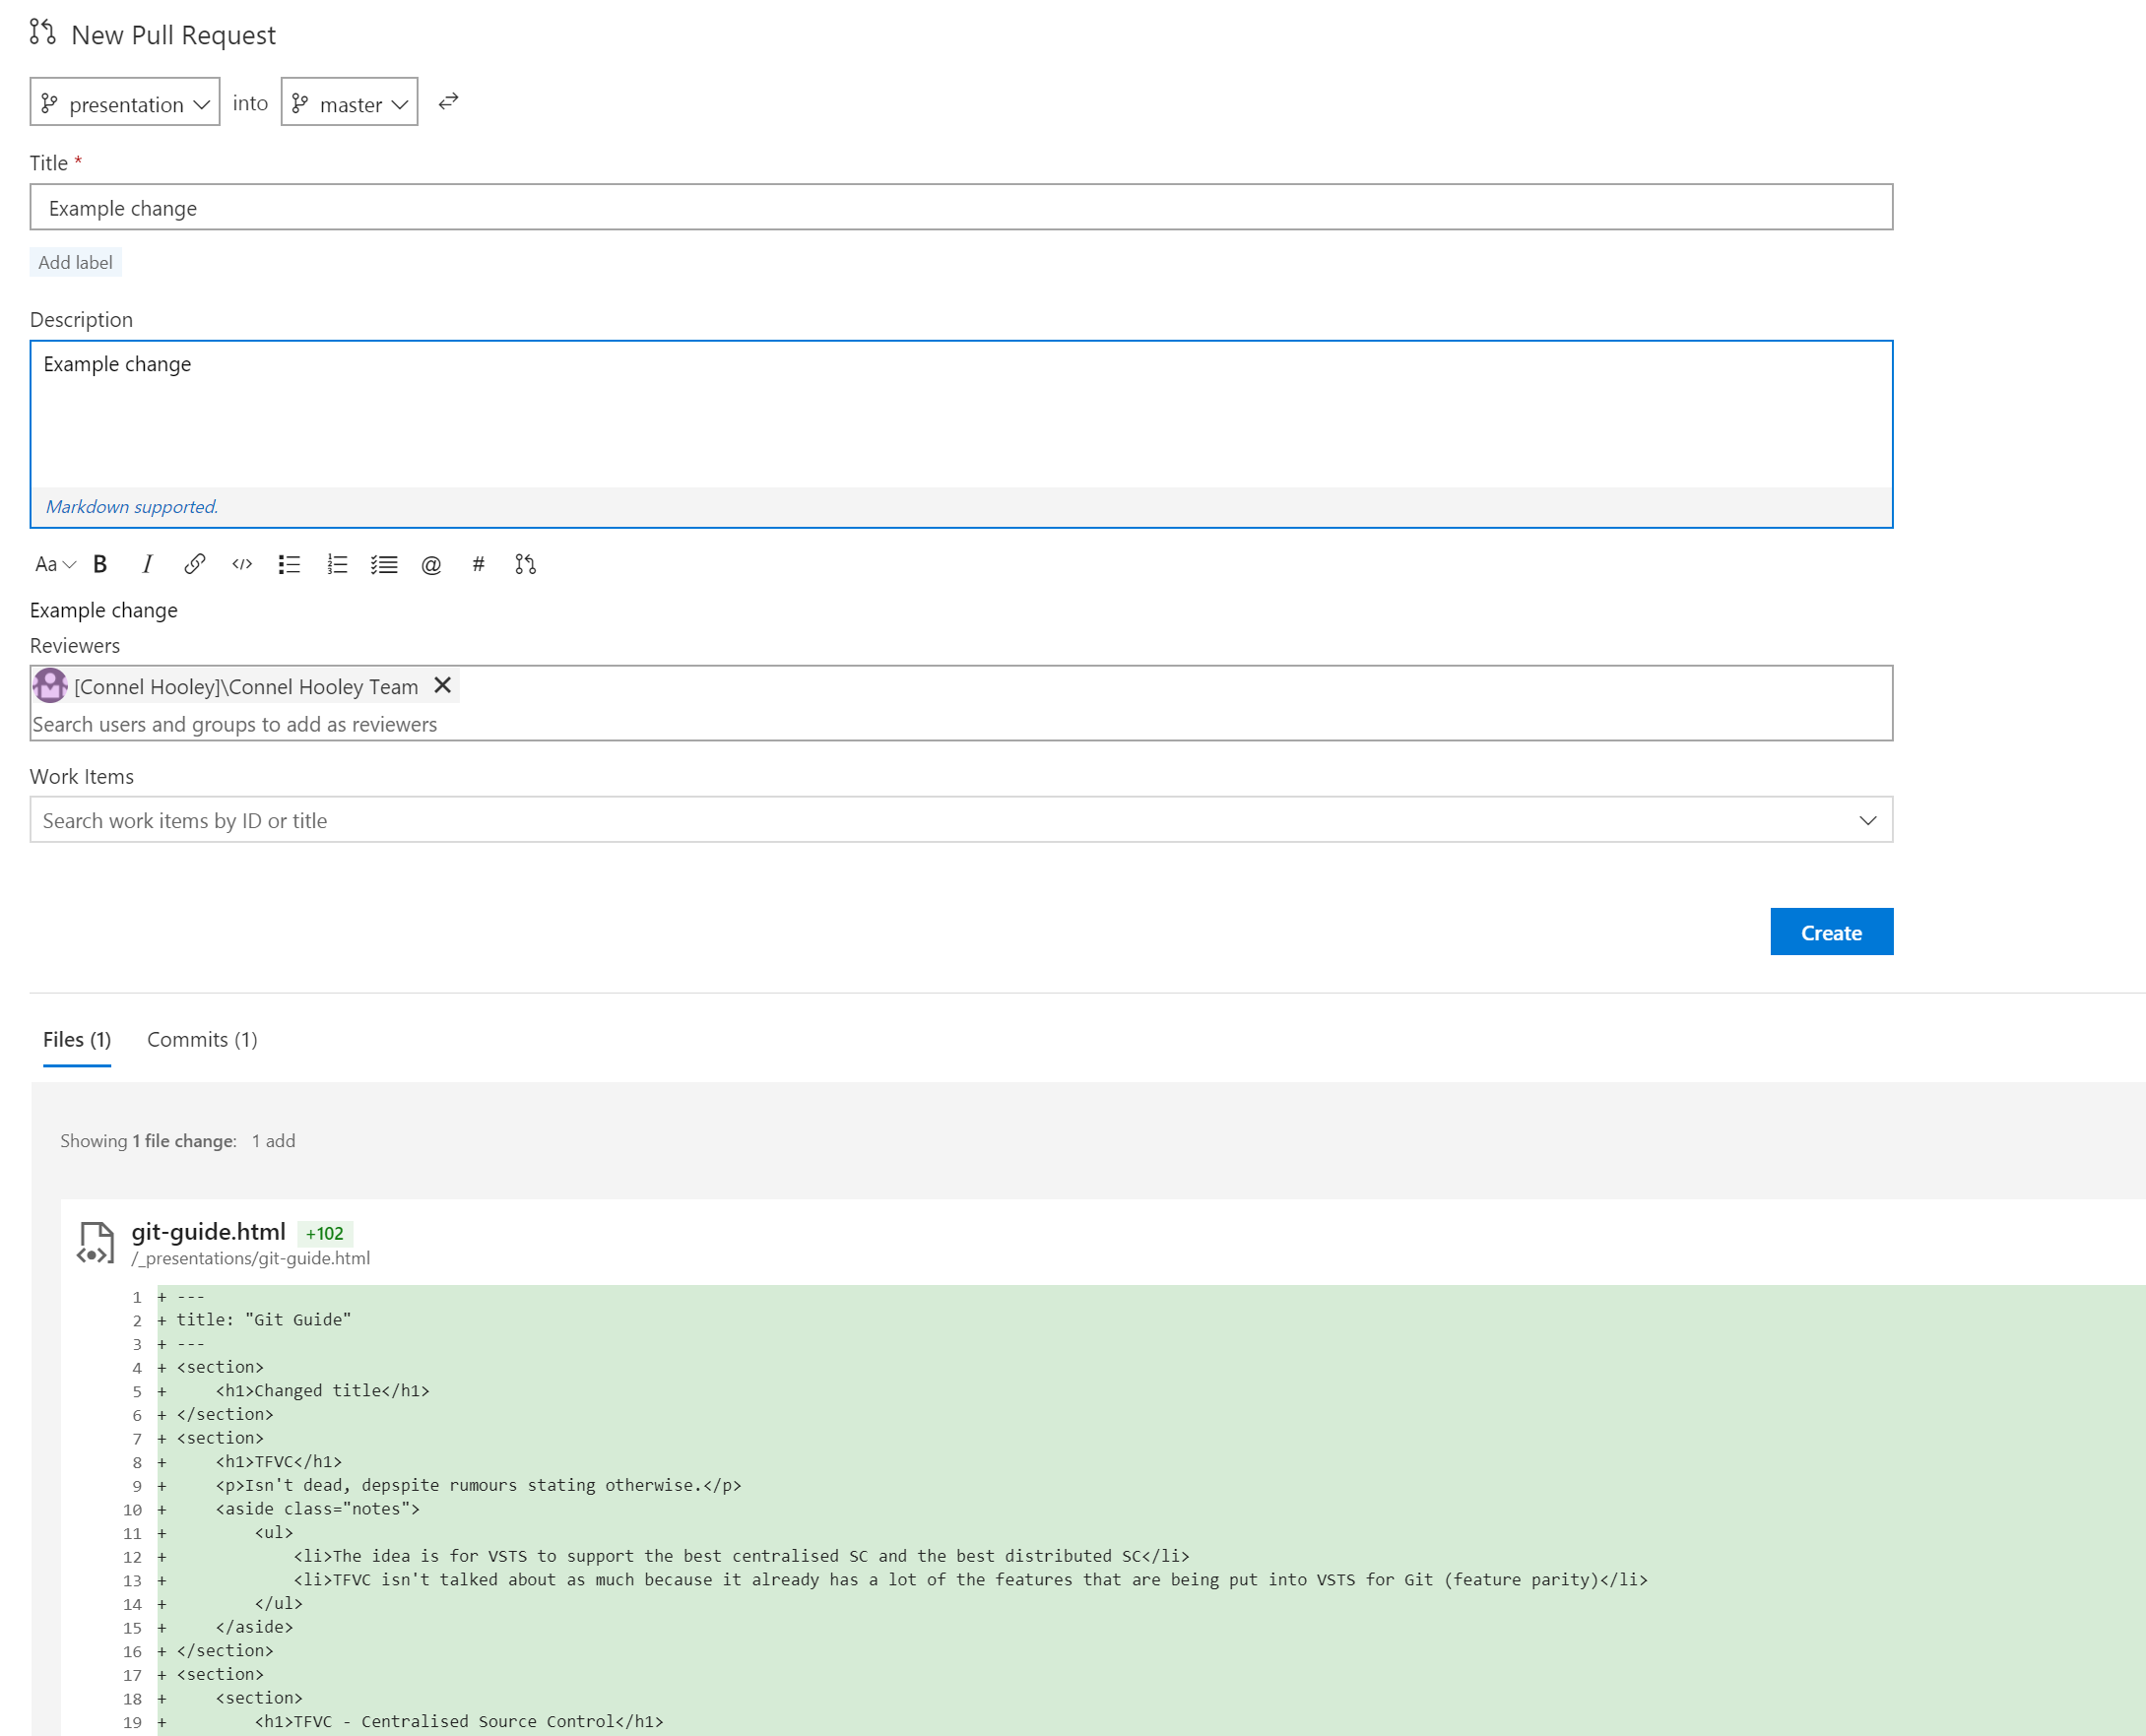
Lets walk through doing a pull request when merging two branches in VSTS...
It brings up this form:
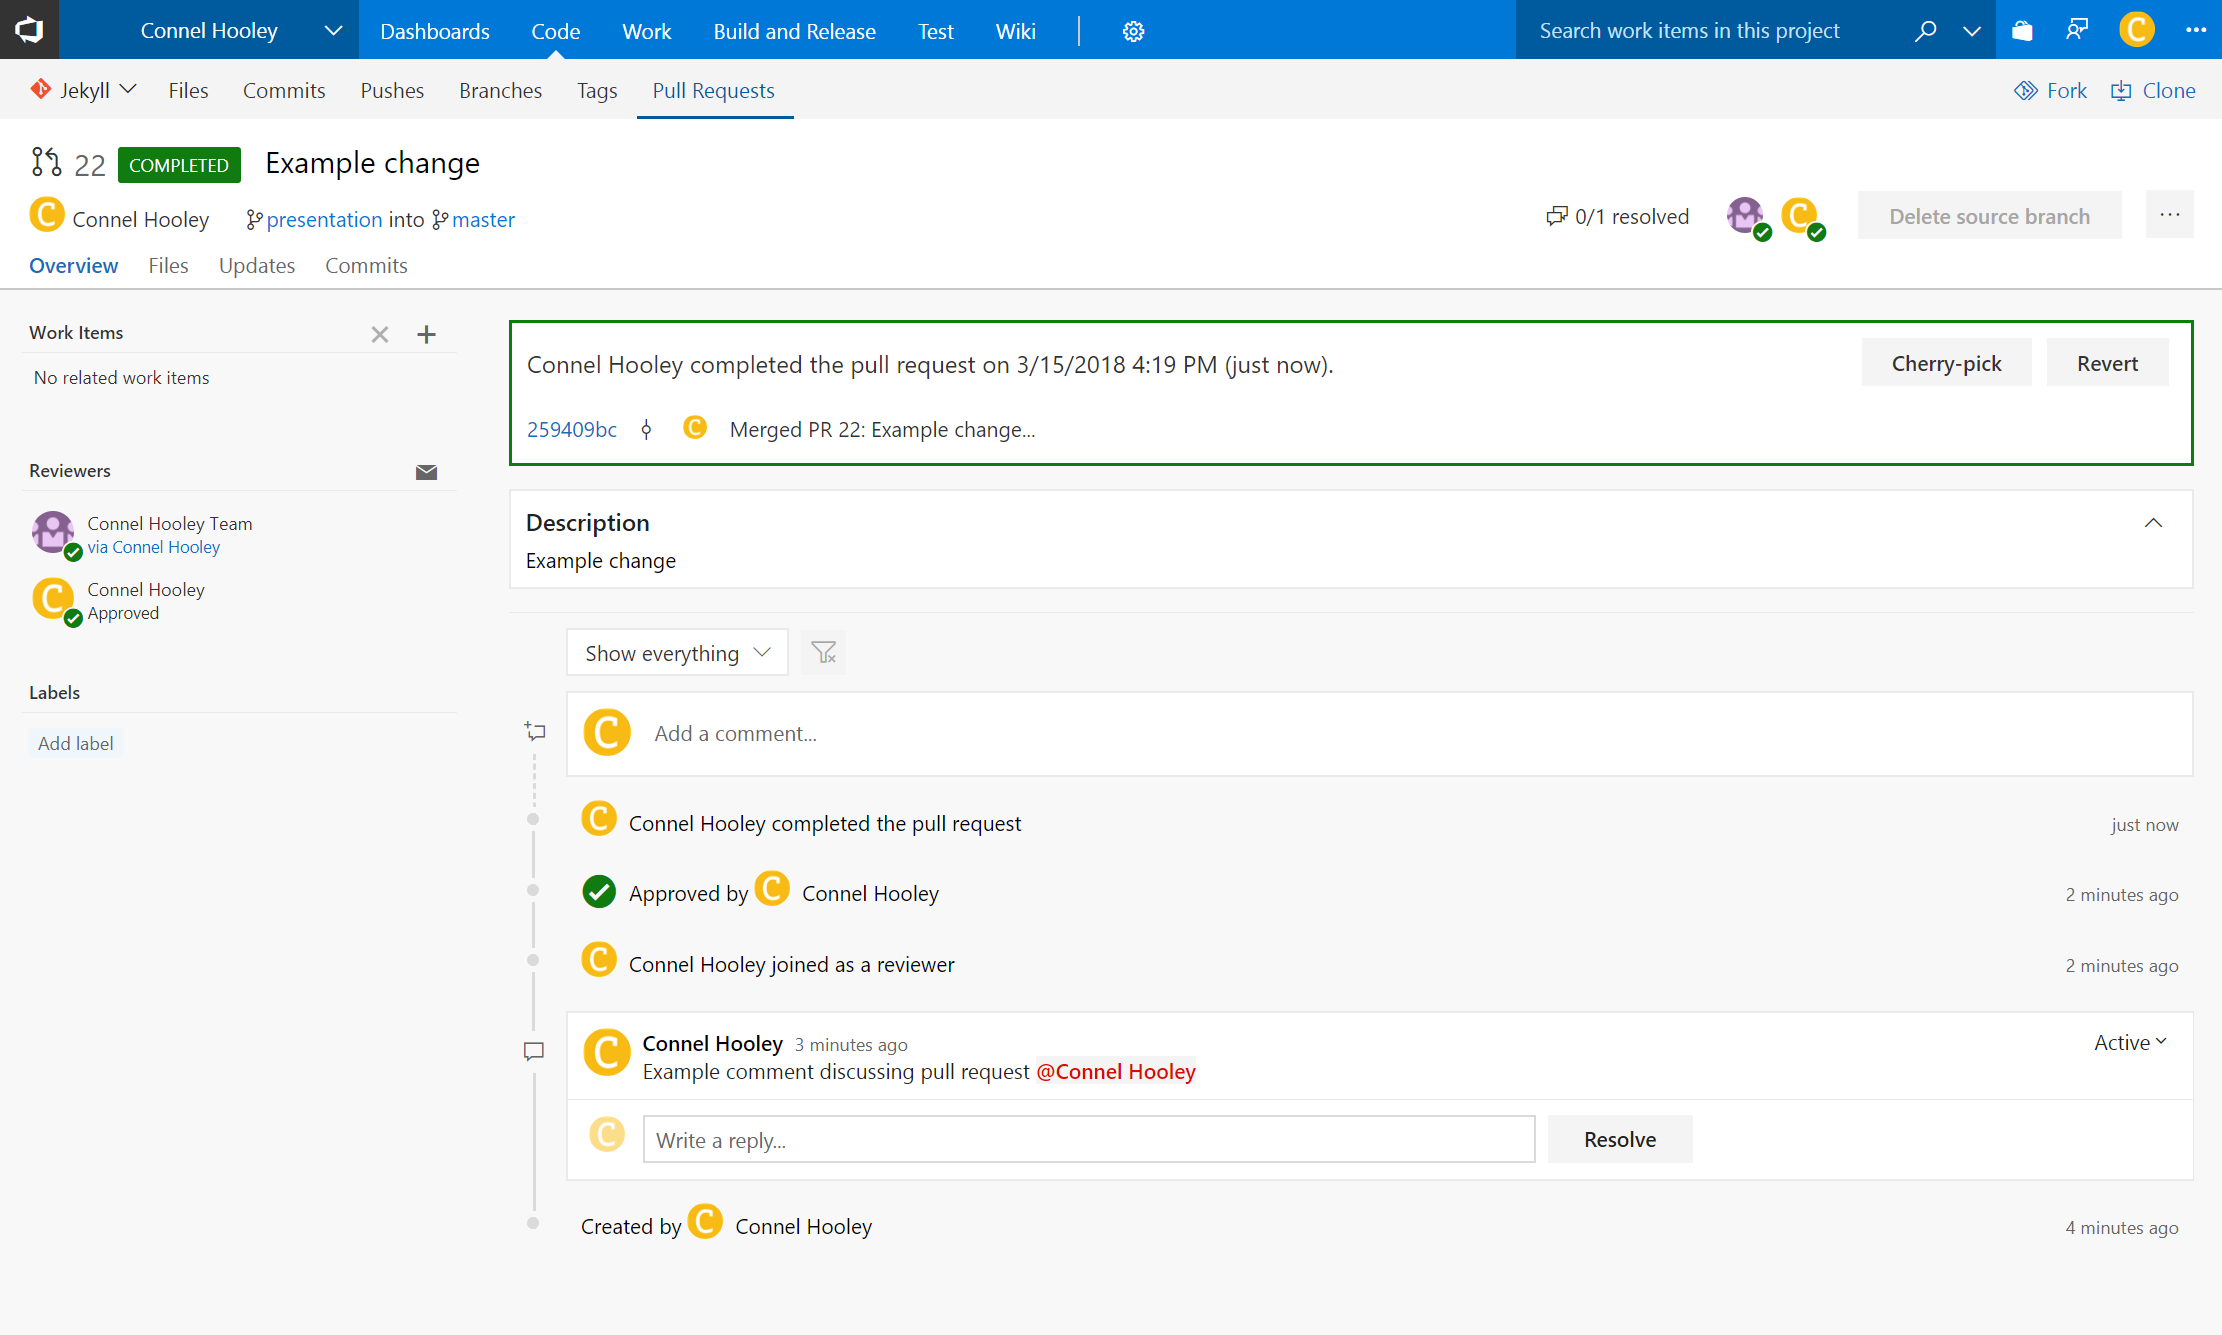
Once it is created we are then given a comments section for all the reviewers to discuss the potential merge:
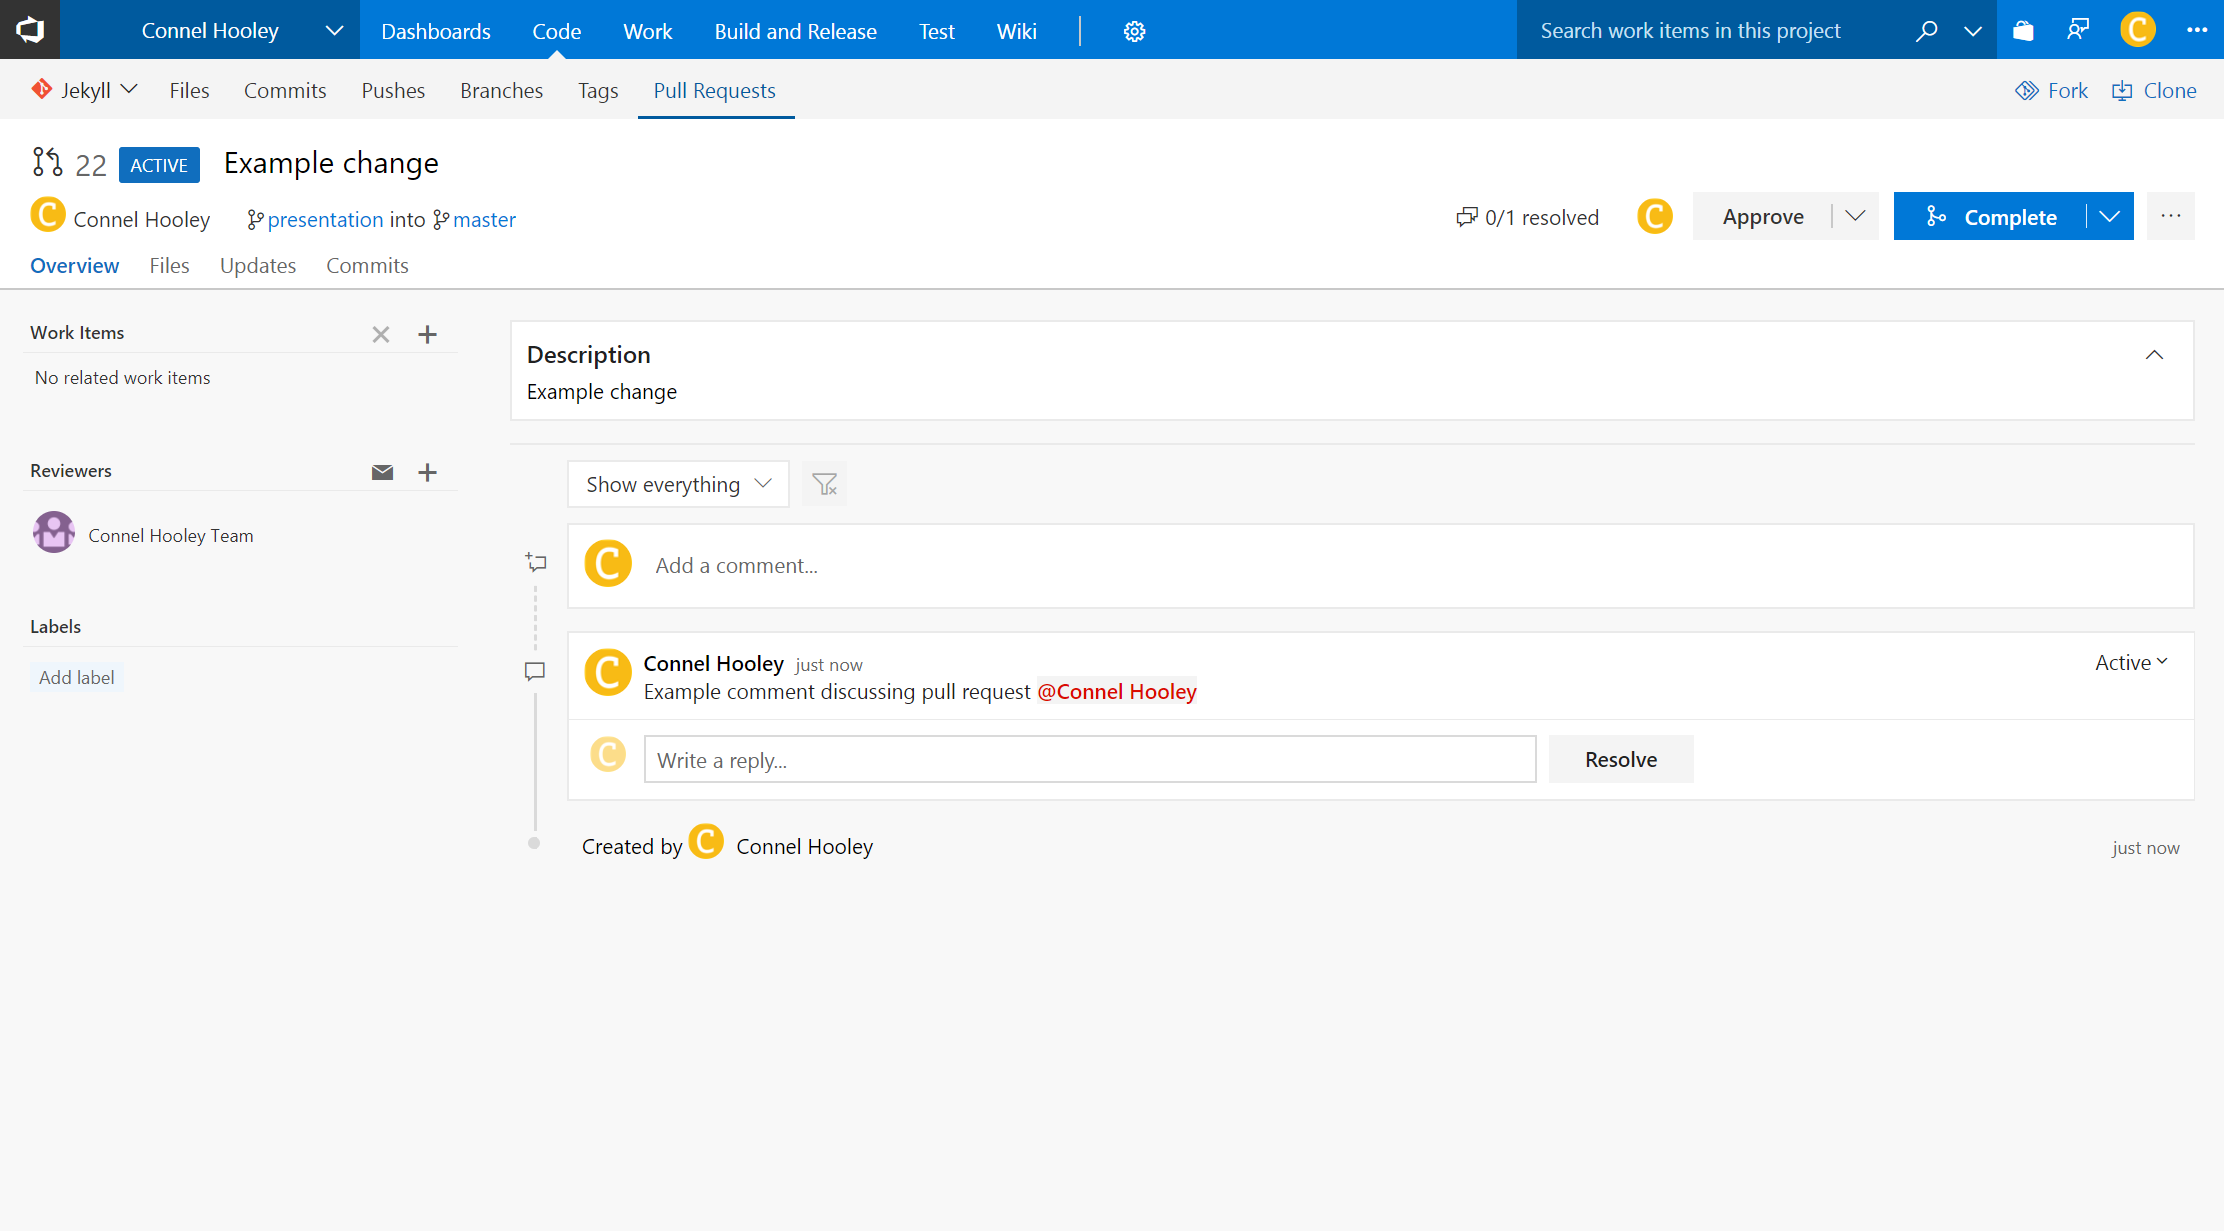
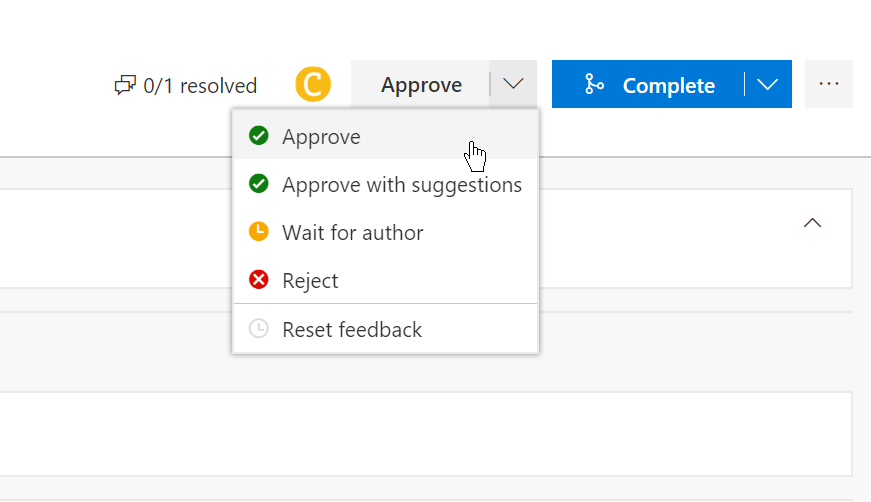
We can then approve or reject the request:
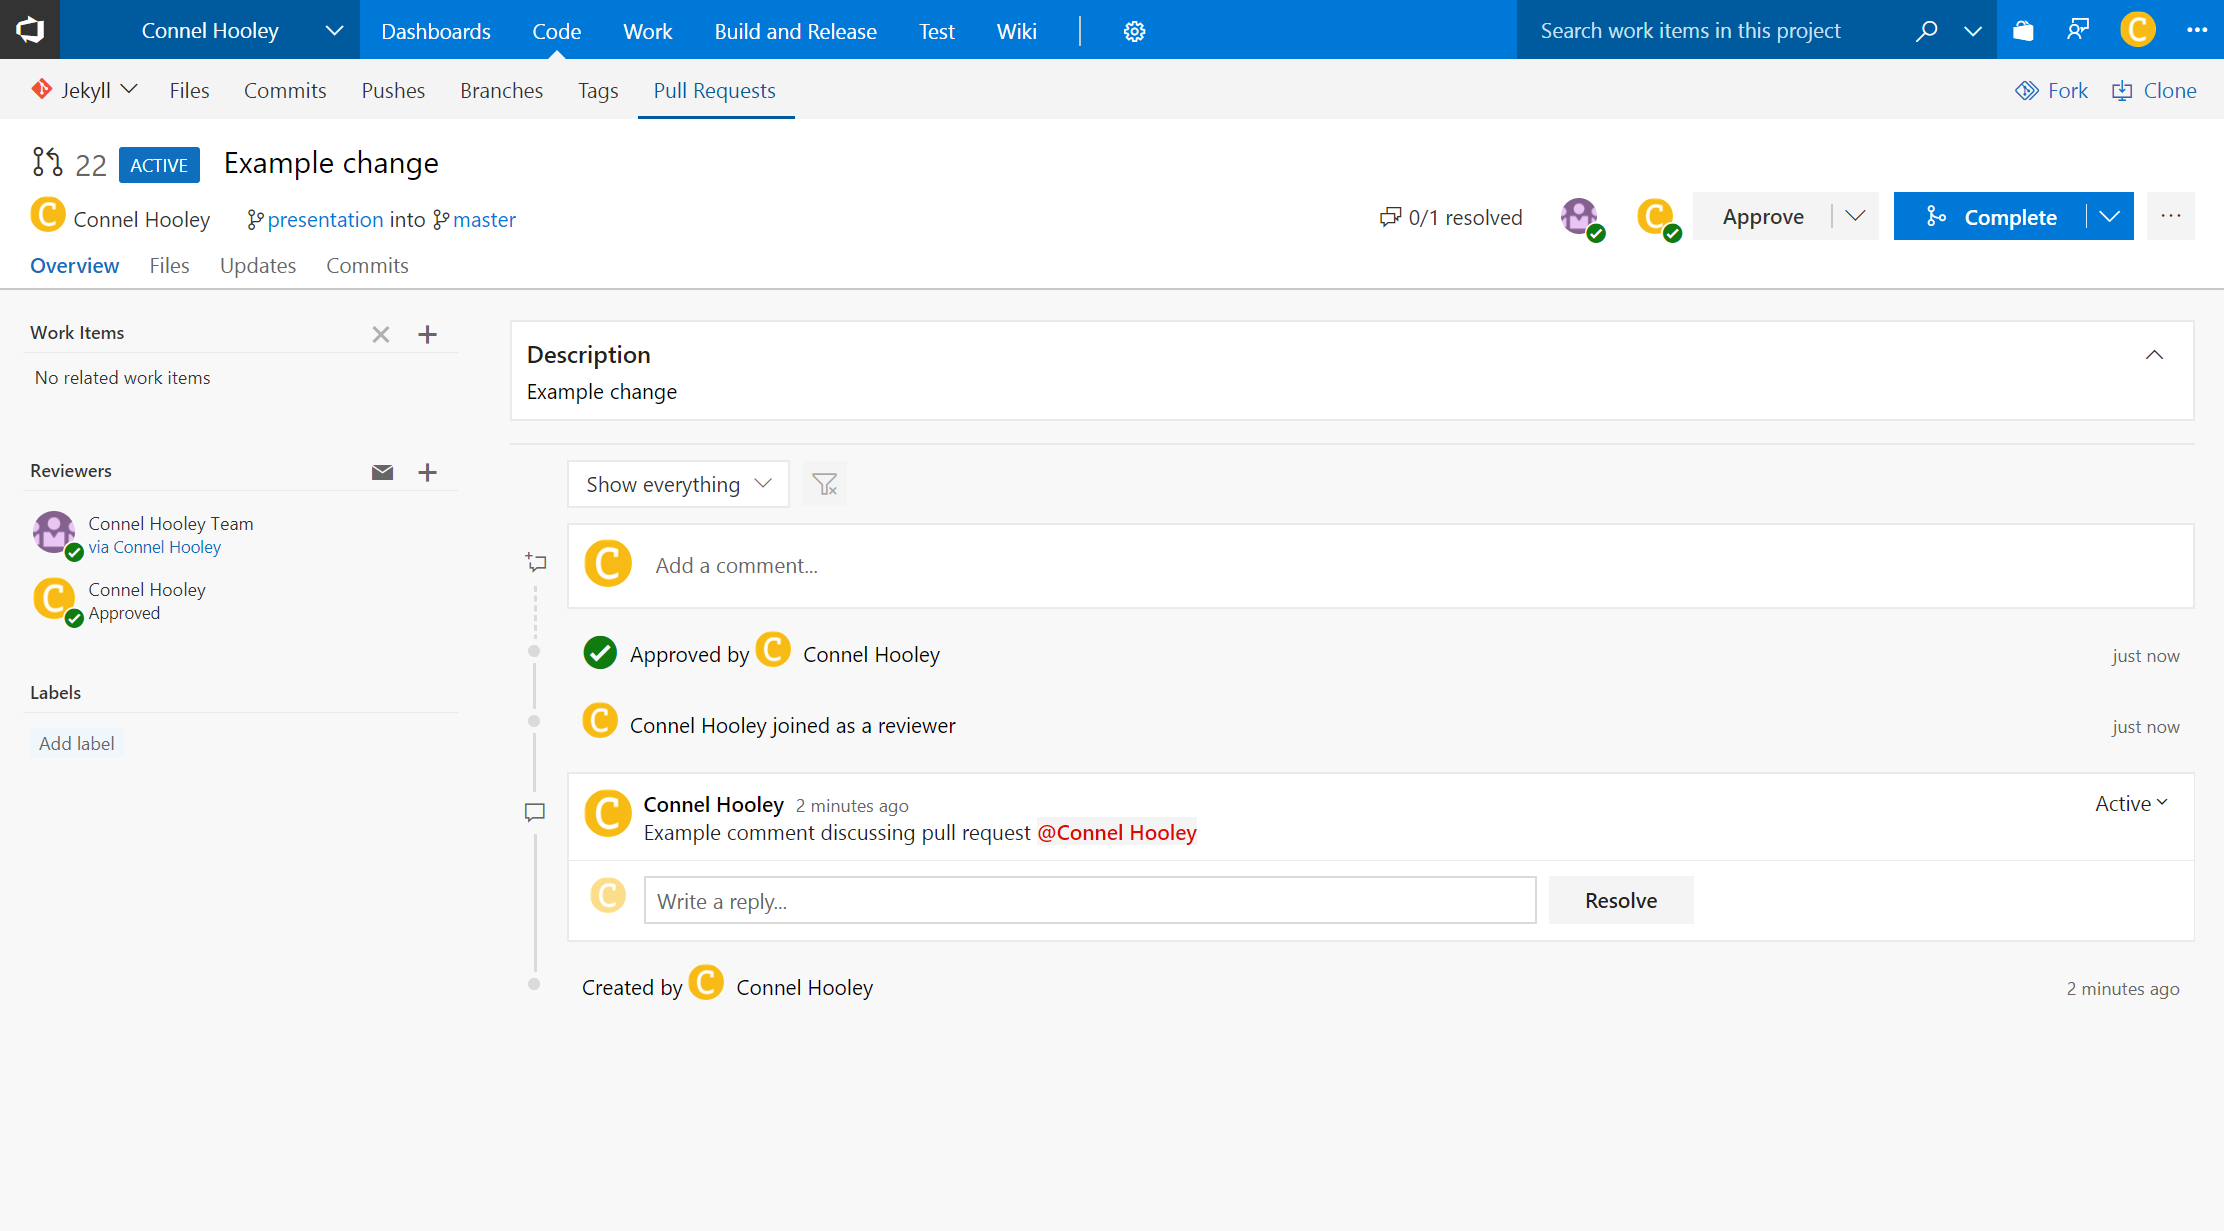
We can then clearly see in the discussions who's approved and rejected the request:
We can also mark each comment as approved or rejected too
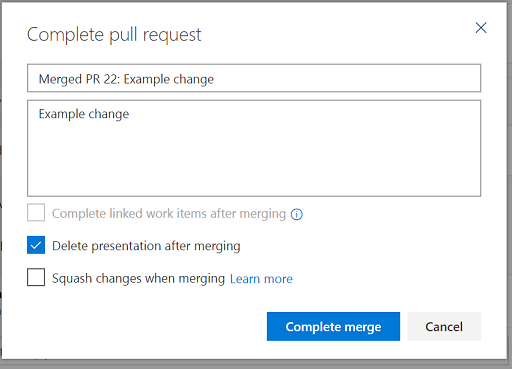
When we're ready we can complete the merge:
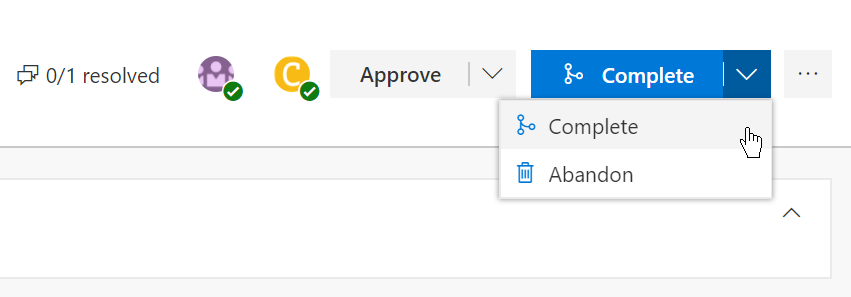
Notice the option to delete the branch, this is perfect for feature branches:
Commit messages are actually separated into two parts
The first line of the message is the commit message
The convention is to keep this line under 72 characters long
Any subsequent lines can contain a more detailed description of the commit
There is no limit to the length of the detailed description
The commit message and detailed description must be separated by a new line
Below is an example commit messages that demonstrates this:
Database timeout bug fix

The user repository was not disposing of the DbContext correctly so I added a using statement.

- I also updated all of the unit tests.
- I also updated all of the integration tests.
When viewing commit history in VSTS the first line is displayed as the commit message, with the rest of it being displayed as a tooltip:


When viewing an individual commit in VSTS the first line is displayed as the commit message, with the rest of it being accessible by clicking on ˅:


Thanks for listening!
Any questions?